
Microservices with Spring Cloud and Spring Boot
Microservices with Spring Cloud – VERSION 2
Latest Versions of Spring Boot and Spring Cloud
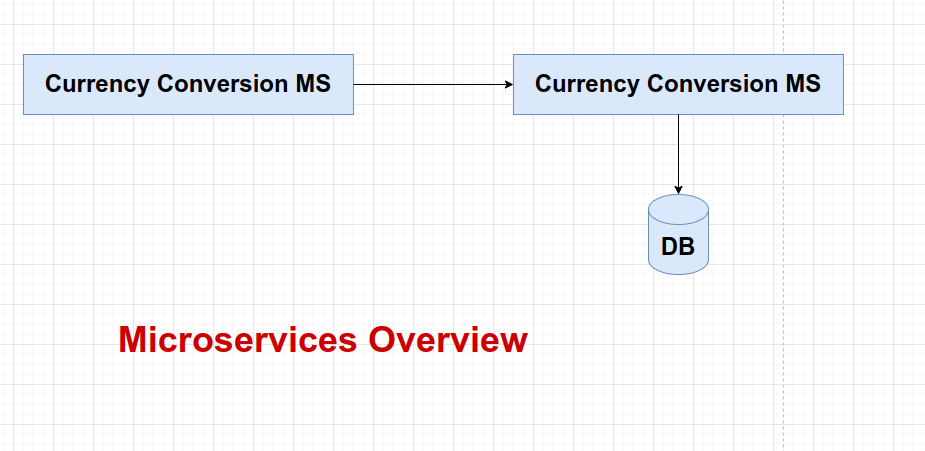
Microservices
Local Git Repository
What’s new
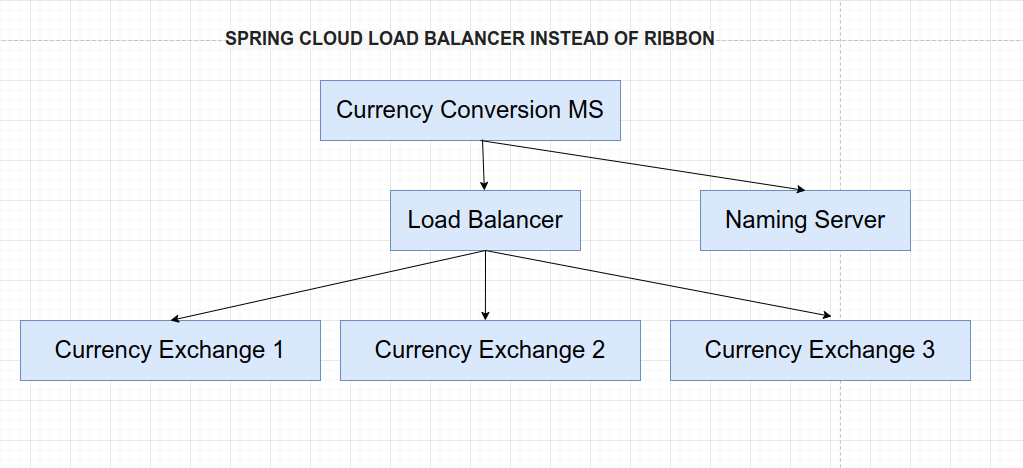
Load Balancing with Eureka, Feign and Spring Cloud Balancer
In production environment we are going to have one instance of CurrencyCalculationService and three instances of CurrencyExchange Service.
- Several instances to check:
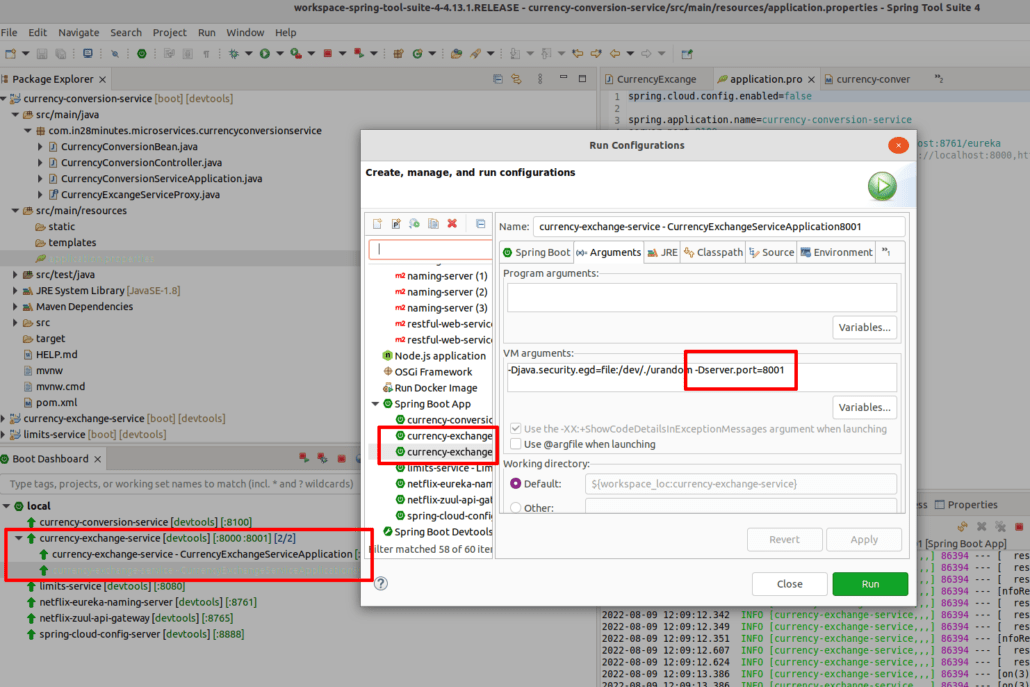
You can run multiple microservice instances to check that load balancing is working properly.
Eureka:
http://localhost:8761
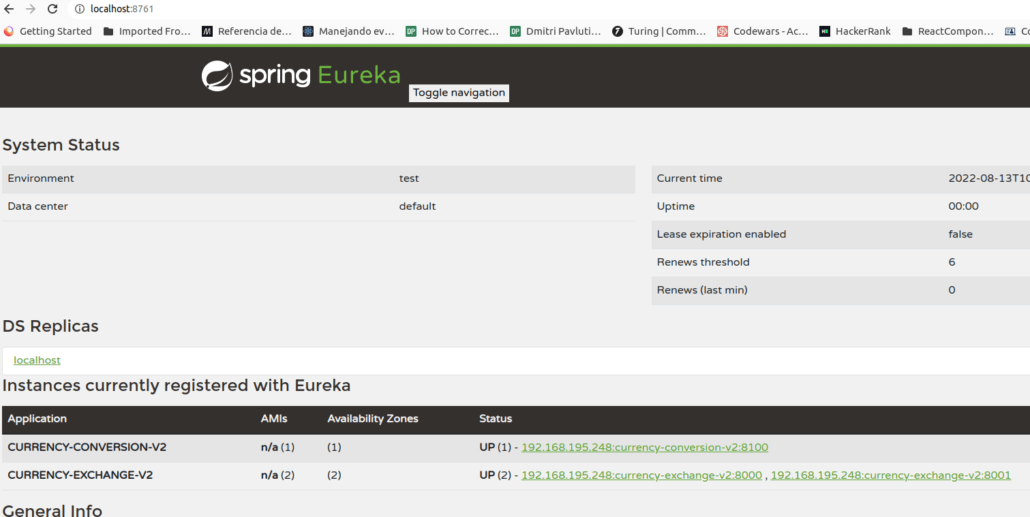
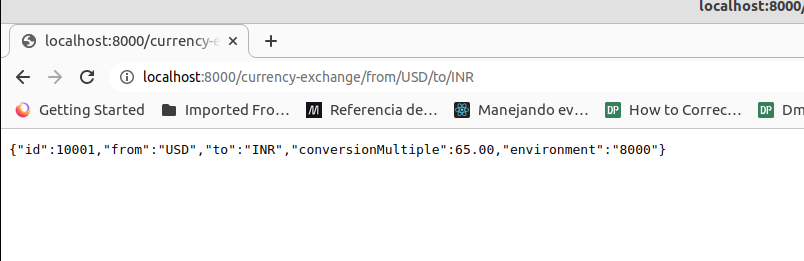
We can see that there are 2 instance of currency-exchange microservice up and running, 8000 and 8001.
If we go and exectue the feing URL again and again (refresh):
http://localhost:8100/currency-conversion-feign/from/USD/to/INR/quantity/90
In the response we will see that the port number changes with each call:
{"id":10001,"from":"USD","to":"INR","quantity":90,"conversionMultiple":65.00,"totalCalculatedAmount":5850.00,"environment":"8000 feign"}
{"id":10001,"from":"USD","to":"INR","quantity":90,"conversionMultiple":65.00,"totalCalculatedAmount":5850.00,"environment":"8001 feign"}
The load balancer is working properly.
Inside of the Currency Conversion Microservice there is a load balancer component which is talking to the naming server, finding the instances and doing automatic load balancing between them. This is called client-side load balancing and this is happening through Feign.
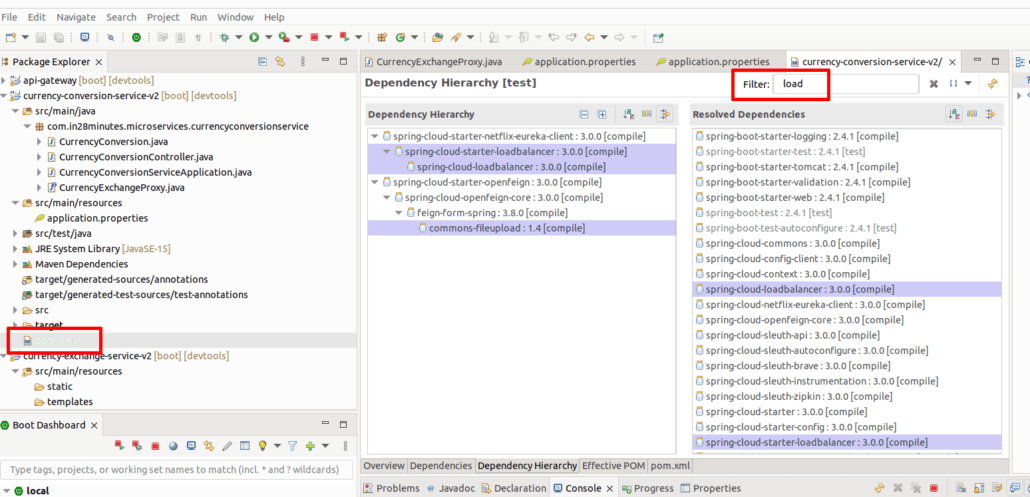
How does Feign do load balancing?
If we go into our currency-conversion-service pom.xml and we look at the dependency hierarchy we can see that there is a load balancer, spring-cloud-starter-loadbalancer. Which is brought into the class path by spring-cloud-starter-netflix-eureka-client and this is the load balancer framework that is used by Feign to distribute the load among the multiple instances which are returned by Eureka. If you are using Eureka and Feign the load balancing comes for free.
Spring Cloud Api Gateway
It may be that we have to manage hundreds of microservices that have a lot of features in common:
- Authentication, authorization and security
- Rate Limits
- Fault Toleration
- Service Aggregation
To implement all these features as a solution we can use an API Gateway.
Since Zuul API Gateway is no longer supported by Netflix, Spring Cloud has moved on and now the recommended option is Spring Cloud Gateway.
API GATEWAY:
http://localhost:8765
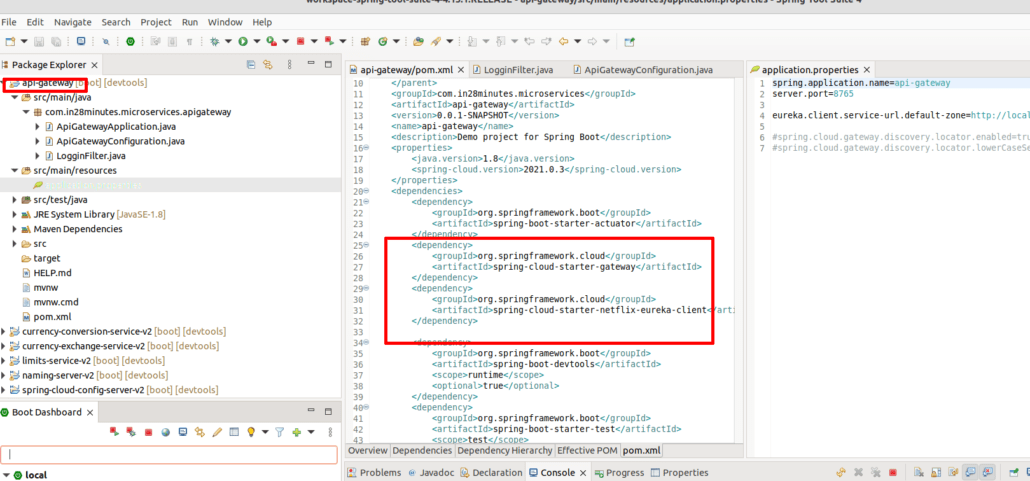
We can proxy through the API gateway to other microservices using Eureka and Cloud Gateway Discovery Locator feature.
Enabling Discovery Locator with Eureka for Spring Cloud Gateway in application.properties file:
spring.cloud.gateway.discovery.locator.enabled=true
spring.cloud.gateway.discovery.locator.lowerCaseServiceId=true
Initial
– http://localhost:8765/CURRENCY-EXCHANGE-V2/currency-exchange/from/USD/to/INR
– http://localhost:8765/CURRENCY-CONVERSION-V2/currency-conversion/from/USD/to/INR/quantity/10
– http://localhost:8765/CURRENCY-CONVERSION-V2/currency-conversion-feign/from/USD/to/INR/quantity/10
Lower Case
– http://localhost:8765/currency-exchange-v2/currency-exchange/from/USD/to/INR
– http://localhost:8765/currency-conversion-v2/currency-conversion/from/USD/to/INR/quantity/10
– http://localhost:8765/currency-conversion-v2/currency-conversion-feign/from/USD/to/INR/quantity/10
We can build custom router for example:
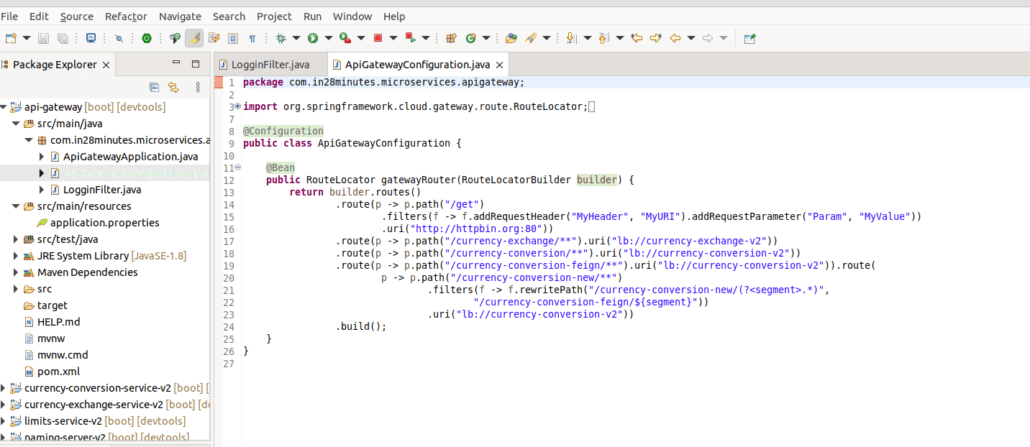
Custom Routes
– http://localhost:8765/currency-exchange/from/USD/to/INR
– http://localhost:8765/currency-conversion/from/USD/to/INR/quantity/10
– http://localhost:8765/currency-conversion-feign/from/USD/to/INR/quantity/10
– http://localhost:8765/currency-conversion-new/from/USD/to/INR/quantity/10
We can implement Spring Cloud Gateway Loggin Filter too and more.
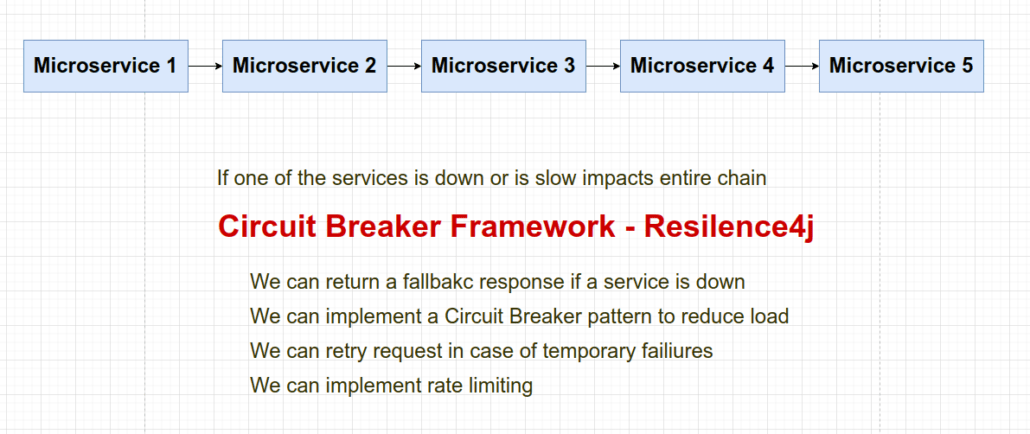
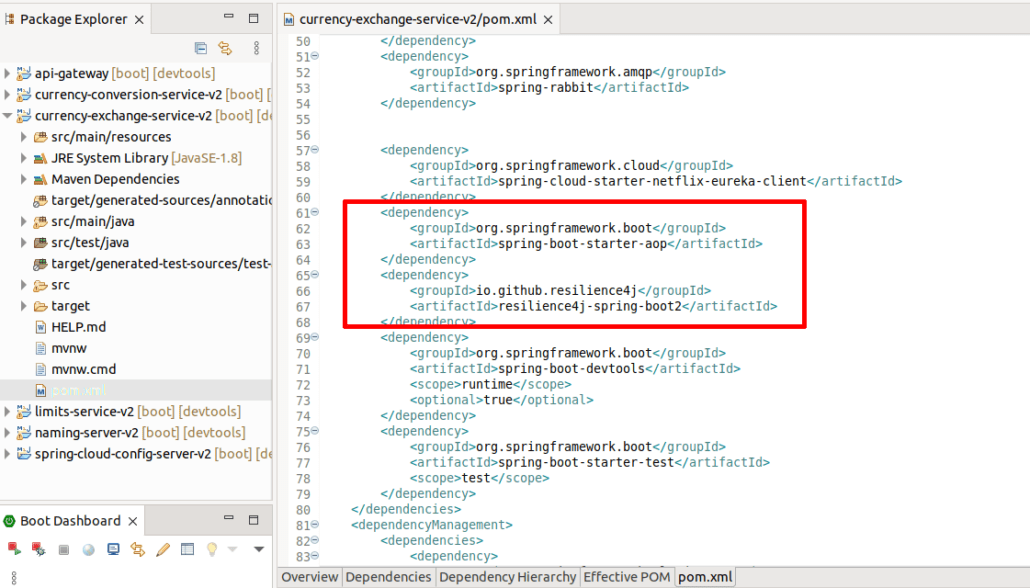
Circuit Breaker – Resilience4j
Resilence4j is a lightweight, easy-to-use fault tolerance library inspired by Neflix Hystrix but designed for Java 8 and functional programming.
- Maven dependencies
- Fallback method
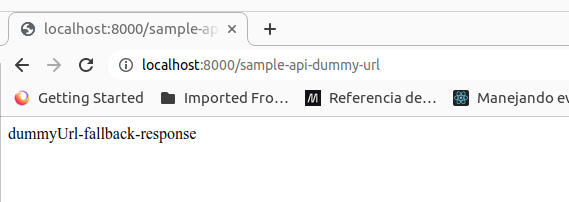
If we load the url :
http://localhost:8000/sample-api-dummy-url
Internally it tries to reach the endpoint 3 times and an error is returned.
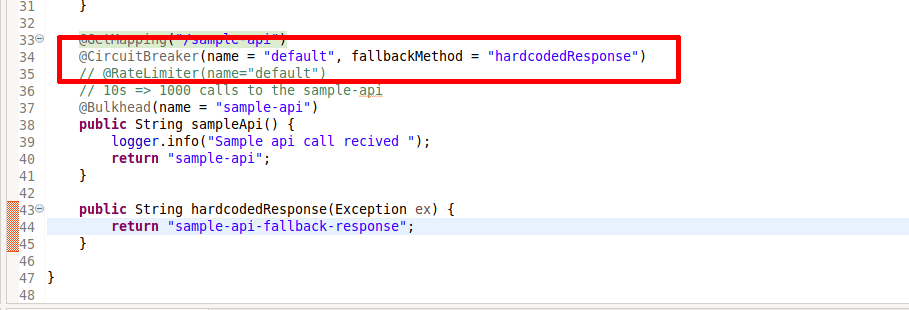
@Retry(name="default")
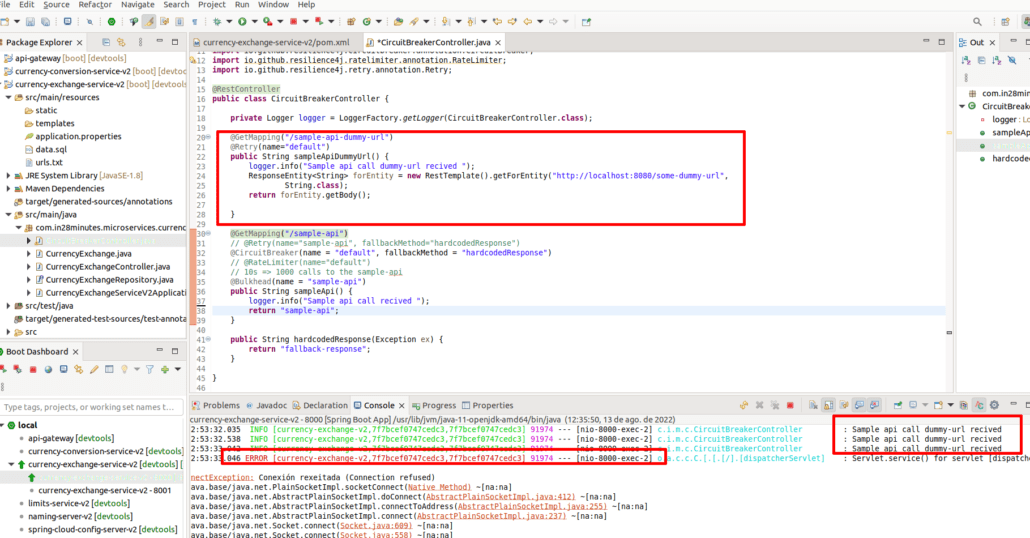
We can change the default values for the number of call retries and configure a fallback method to not return an error:
@Retry(name="sample-api-dummy-url")
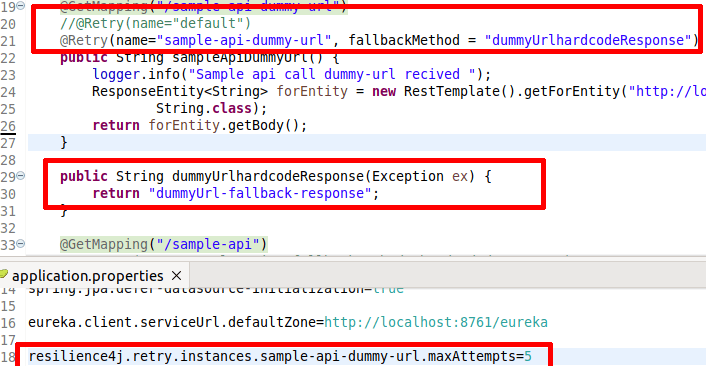
Response fallback method:
Five calls:

Also, we can configure (application.properties) what should be the interval between retries:
resilience4j.retry.instances.sample-api-dummy-url.waitDuration=1s
The other thing we can also configure is exponential backoff:
resilience4j.retry.instances.sample-api-dummy-url.enableExponentialBackoff=true
First retry happened after one second. The second retry happened after one and a half seconds. The third retry happened after almost two and a half seconds and the next retry took about four seconds, almost four seconds.
So, you can see that each subsequent retry is taking longer and longer, and that’s what is called Exponential Backoff.
Whenever you are working on the Cloud, for example AWS, and you are working with some API, most of the APIs use Exponential Backoff.
These features that we have seen are useful when a service is momentarily down. We’ve just give the service a little bit of time and then call it again.
However, if the service is really down for a long time we would go for a Circuit Breaker pattern.
- Circuit Breaker Features
To see the magic of CircuitBreaker, what we would need to do is to fire a lot of request to this specific API.
We open a terminal and we use watch command (In my case, I use GNU/Linux OS):
watch curl http://localhost:8000/sample-api

We send a request every 2 seconds but what we want is a little bit more than that, maybe 10 request per second.
watch -n 0.1 curl http://localhost:8000/sample-api-dummy-url-cb

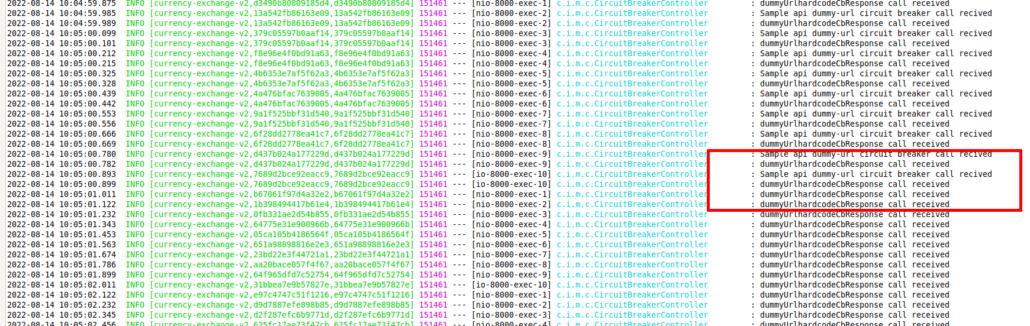
It’s firing 10 requests a second and what you would see right now when you go back to the console is that the CircuitBreaker sample api is being called up to a certain extent and after that, you’d see that there are requests going on. However, you’d see that there are no method calls in here.
The CircuitBreaker is returning the response back without even calling this method.
At this point, it proceeds to analyze the states of the CircuitBreaker (CLOSED,OPEN and HALF_OPEN) to determine when the microservice recovers.
If a microservice is down, then what does the CircuitBreaker do?
Property-based configuration: Spring Boot 2
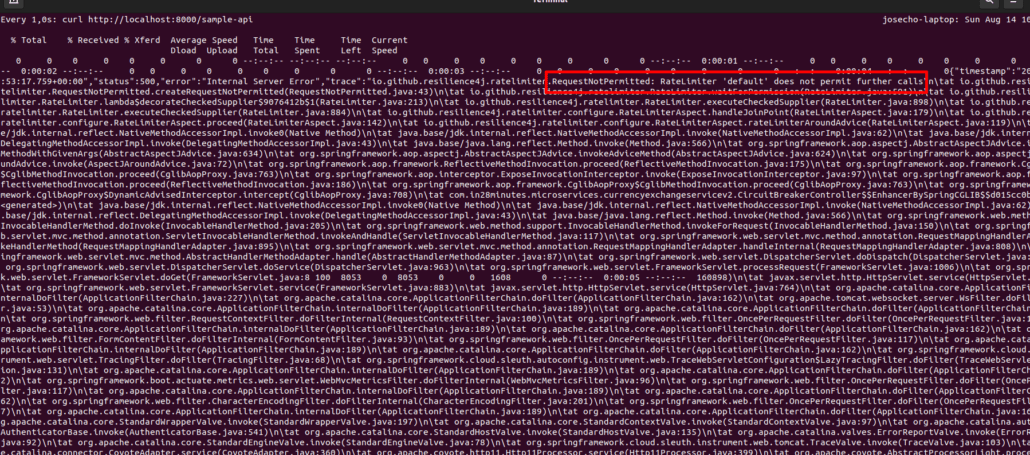
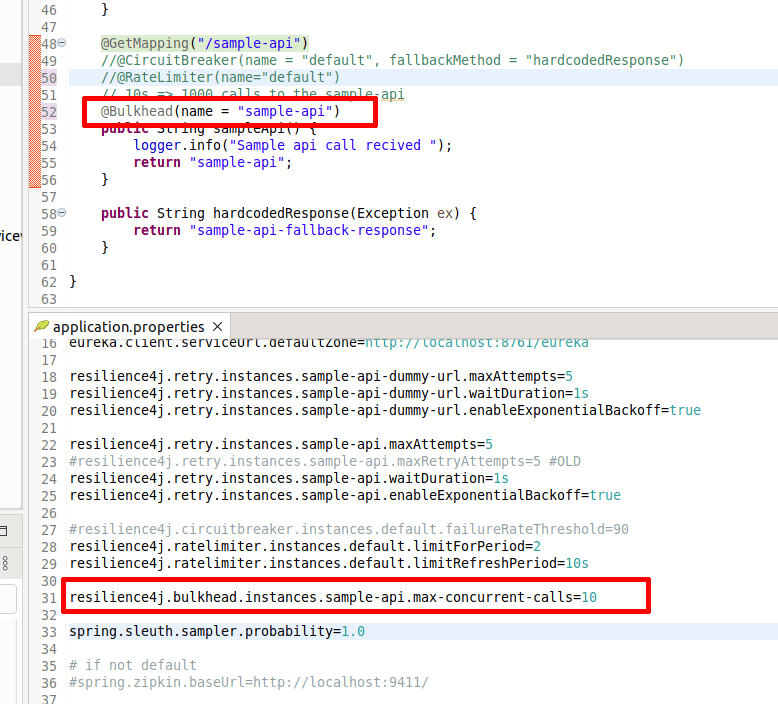
- Rate Limiting and BulkHead
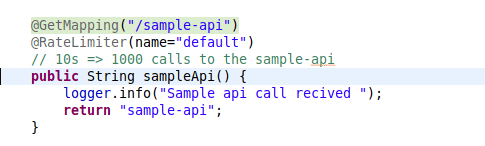
Basically, rate limiting is all about saying, in 10 seconds, I’d want to only allow 10000 call to the sample API. We are setting a time period and during that time period, we only want to allow a specific number of calls and we are configuring it to a specific API.
CircuitBreakerController
@RateLimiter(name="default")
// 10s => 1000 calls to the sample-api
application.properties
resilience4j.ratelimiter.instances.default.limitForPeriod=2
resilience4j.ratelimiter.instances.default.limitRefreshPeriod=10s
You can see that some of the requests are successful, they are returning sample API back, but you’d see that a few other responses would be failing. We can see that this is giving me does not permit more calls. If I go to the browser and try and fire in a few requests, success and the next one is getting an error.
watch -n 1 curl http://localhost:8000/sample-api
In addition to RateLimiter, you can also configure how many concurrent calls are allowed. That’s called BulkHead. For each of the APIs inside a microservice, you can configure a bulkhead.
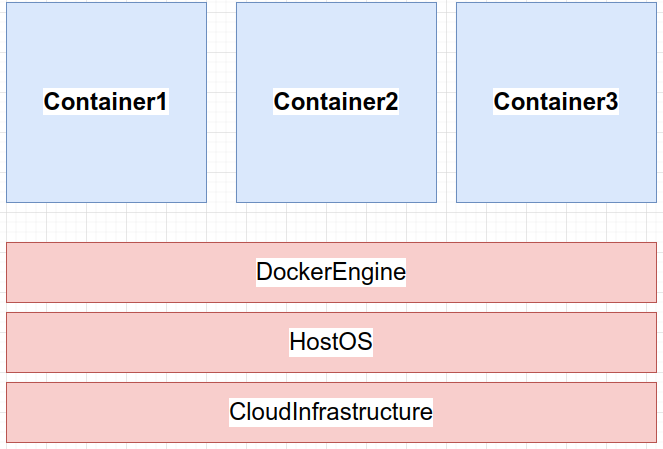
DOCKER: CONTAINERIZE MICROSERVICE
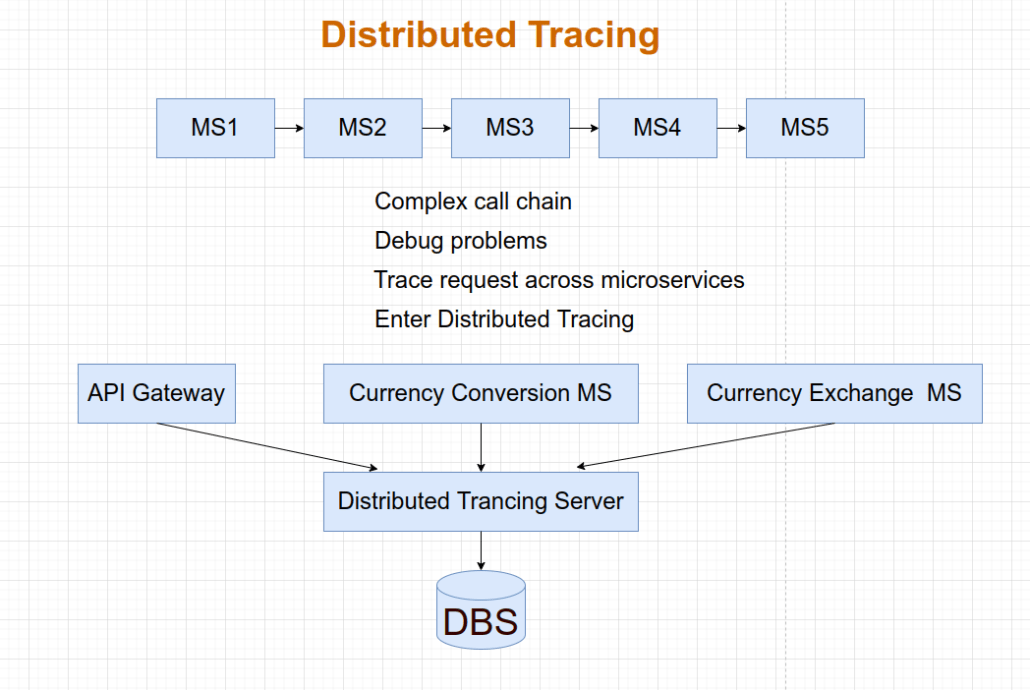
Distributed Tracing
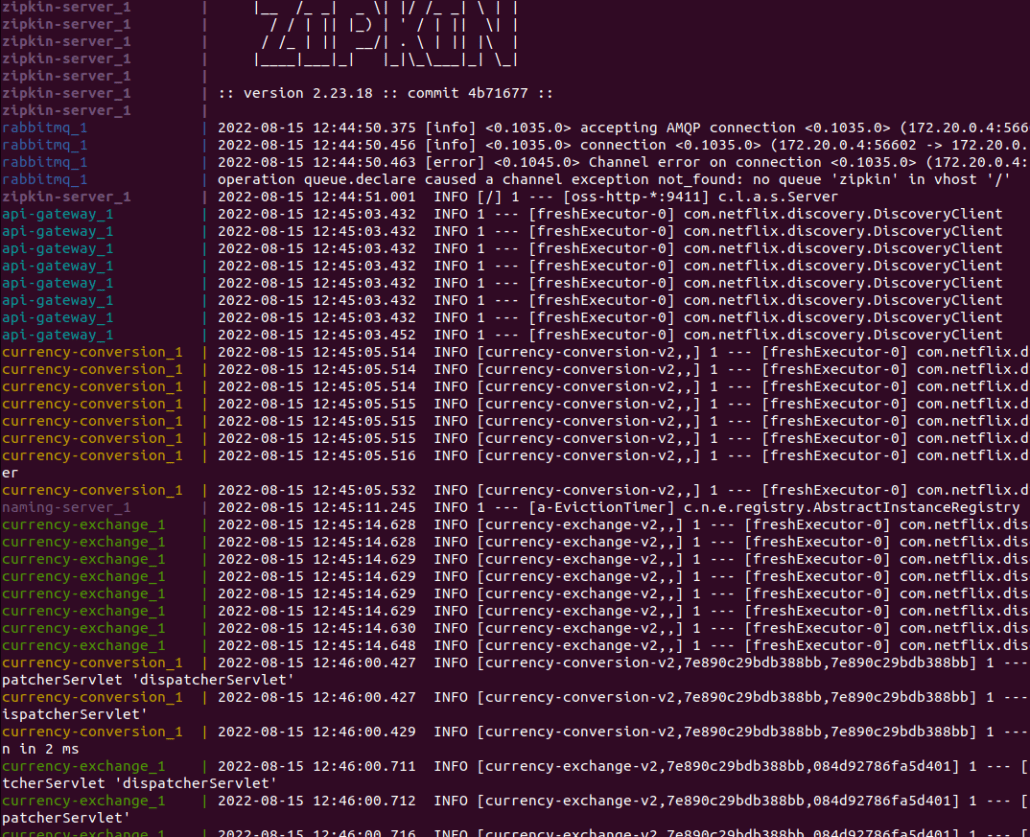
Here we can follow the same steps indicates in the post that talks about Spring Cloud Version 1 but we are going to use Docker because it is something that version 2 allows us.
To be honest, I never got to follow the Zipkin or Rabbit MQ installation steps during the microservices learning course in version 1, this is the greatness of Docker, it makes all that work easier for us.
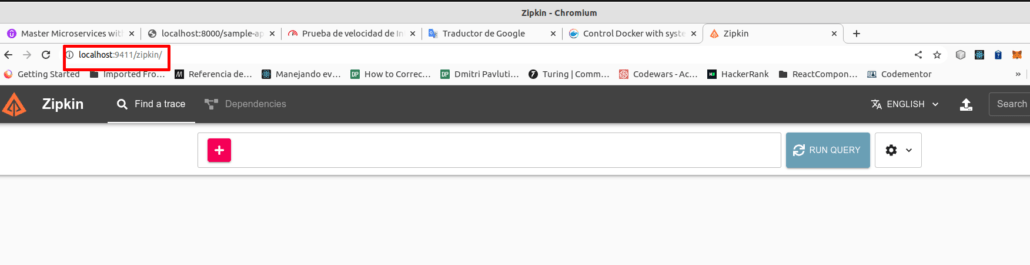
- Launching Zipkin Container using Docker
docker run -p 9411:9411 openzipkin/zipkin:2.23
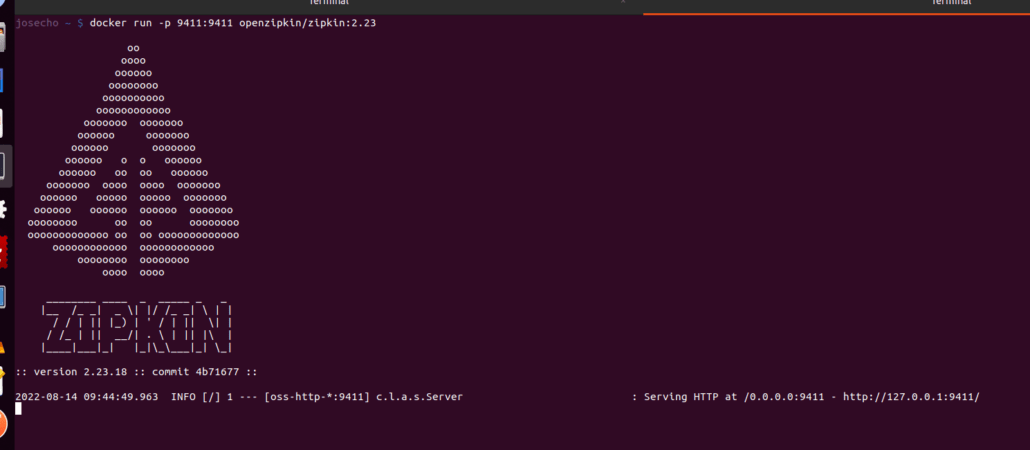
This is very cool, we don’t need to store anything about Zipkin in our local machine.
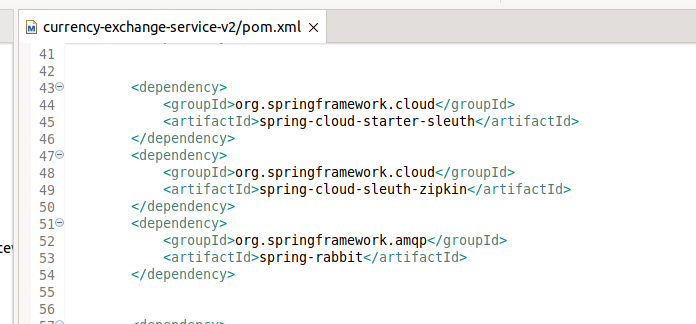
- Connecting Currency Exchange , Currency Conversion Microservices and API Gateway with Zipkin
We want to be able to trace the request across multiple microservices. And to be able to do that, each request should be assigned a unique Id. Sleuth is one of the frameworks which actually assigns a unique Id to each request. The request goes across multiple microservices, the Id is maintained and the information is sent out to the tracing server using that specific Id. And this allows us to trace the request across multiple microservices. That’s the reason why we would need spring-cloud-starter-sleuth.

However, consider a scenario when the Distributed Tracing Server is down. The information from these microservices is lost. To prevent that from happening what we can do is have a queue in between, a queue like Rabbit MQ. All the microservices can send the information out to the Rabbit MQ queue and the Distributor Tracing Server can be picking up the information from the Rabbit MQ. This would ensure that even if the Distributor Tracing Server is down, the microservices can keep sending messages to Rabbit MQ. And when the Distributor Tracing Server is up, it can pick up the messages from the queue.

If it trace every request, then there’ll be a big performance impact. And to avoid that, we configure something called sampling. We would want to sample, let’s say, 10 percent of the request, 20 percent of the requests.We’d want to also configure sampling.
application.properties
spring.sleuth.sampler.probability=1.0
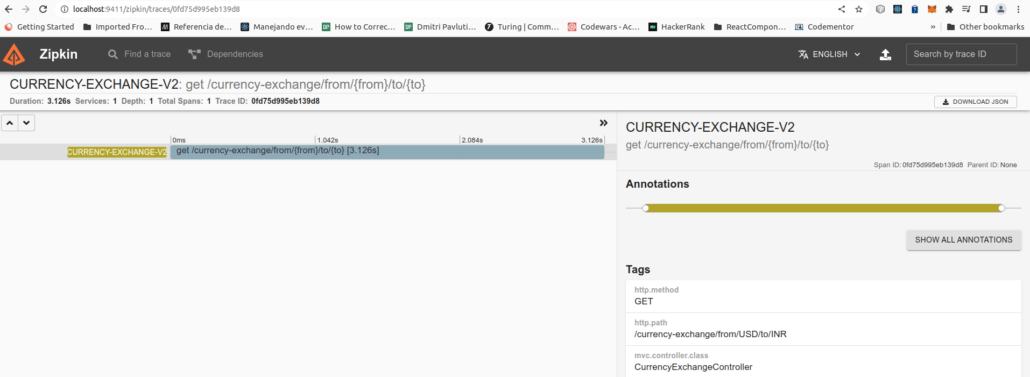
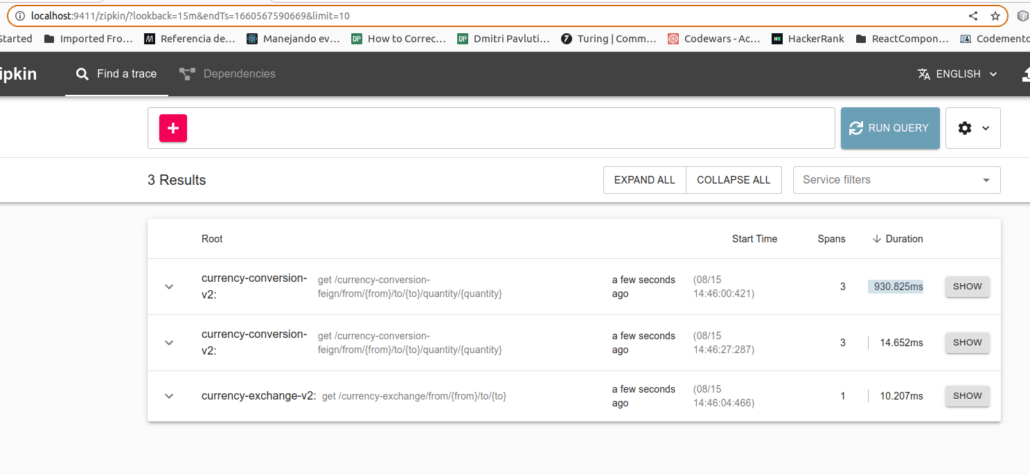
After a call:
http://localhost:8000/currency-exchange/from/USD/to/INR
Tracing is working:
Docker is amazing!!!
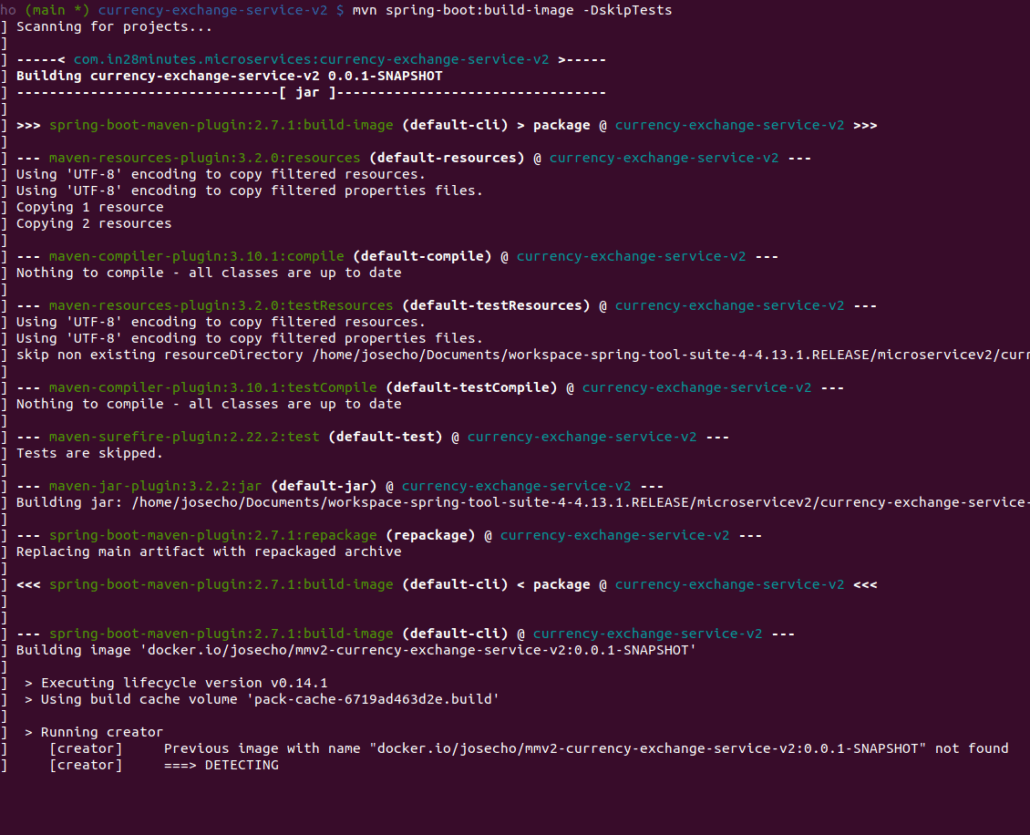
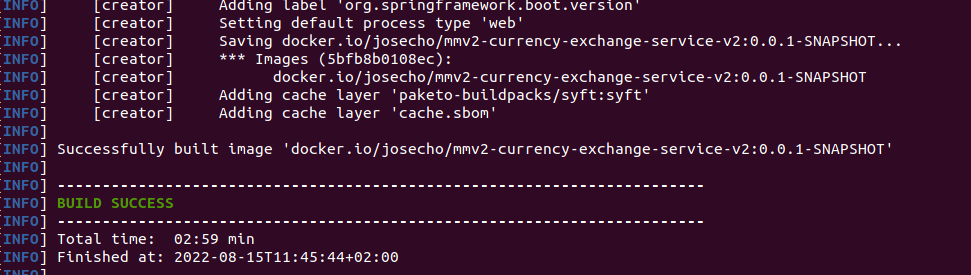
- Creater Container images
Spring Boot in the version 2.3 made very easy to create Docker containers. All that you need to do is to use the Maven plugin, we can use this spring-boot-maven-plugin to create a image for our container.
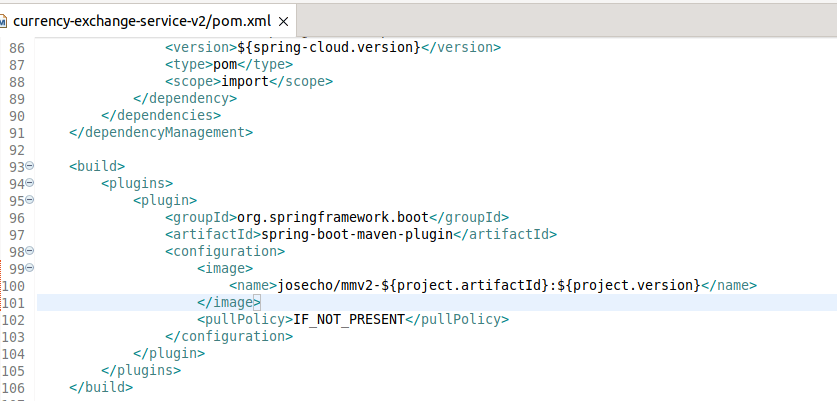
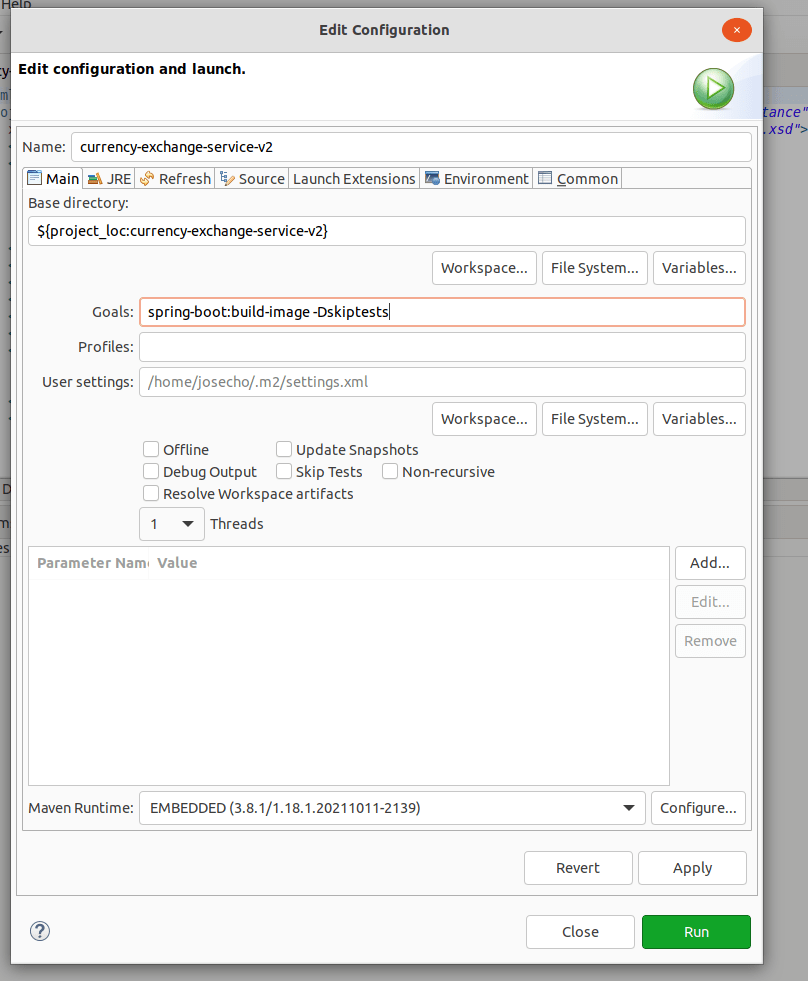
mvn spring-boot:build-image -DskipTests
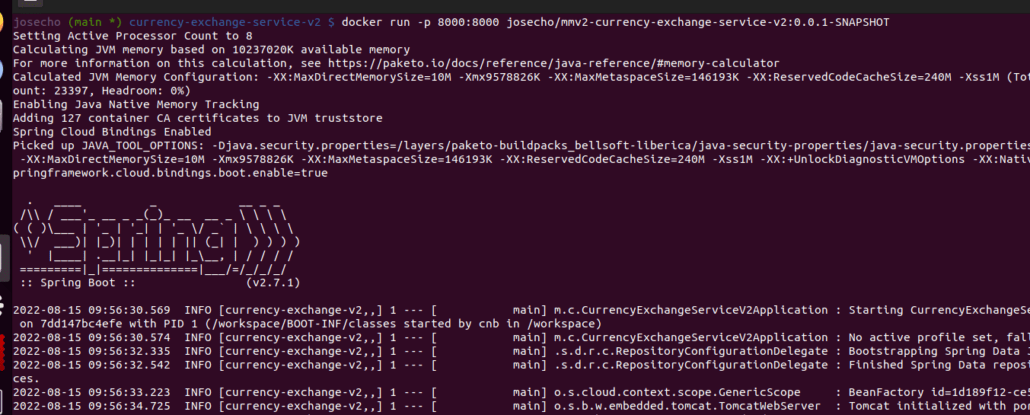
docker run -p 8000:8000 josecho/mmv2-currency-exchange-service-v2:0.0.1-SNAPSHOT
docker-compose up
- The currency-conversion URL, the direct one, failed.
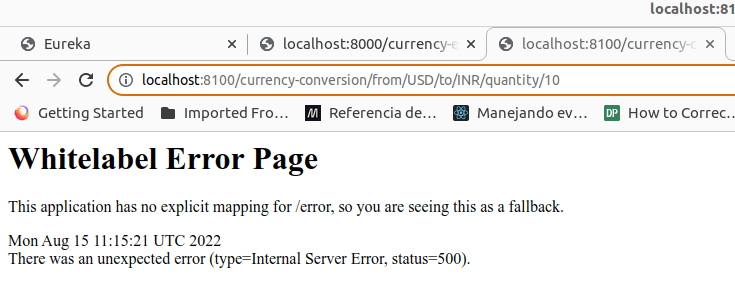
- The currency-conversion-feign URL , succeeds.

If we look at the code for this CurrencyConversionController, thes currency-conversion-feign is working because this is going to the proxy and this uses Eureka.However, the currency-conversion one,we are directly calling localhost:8000 and this does not really work.
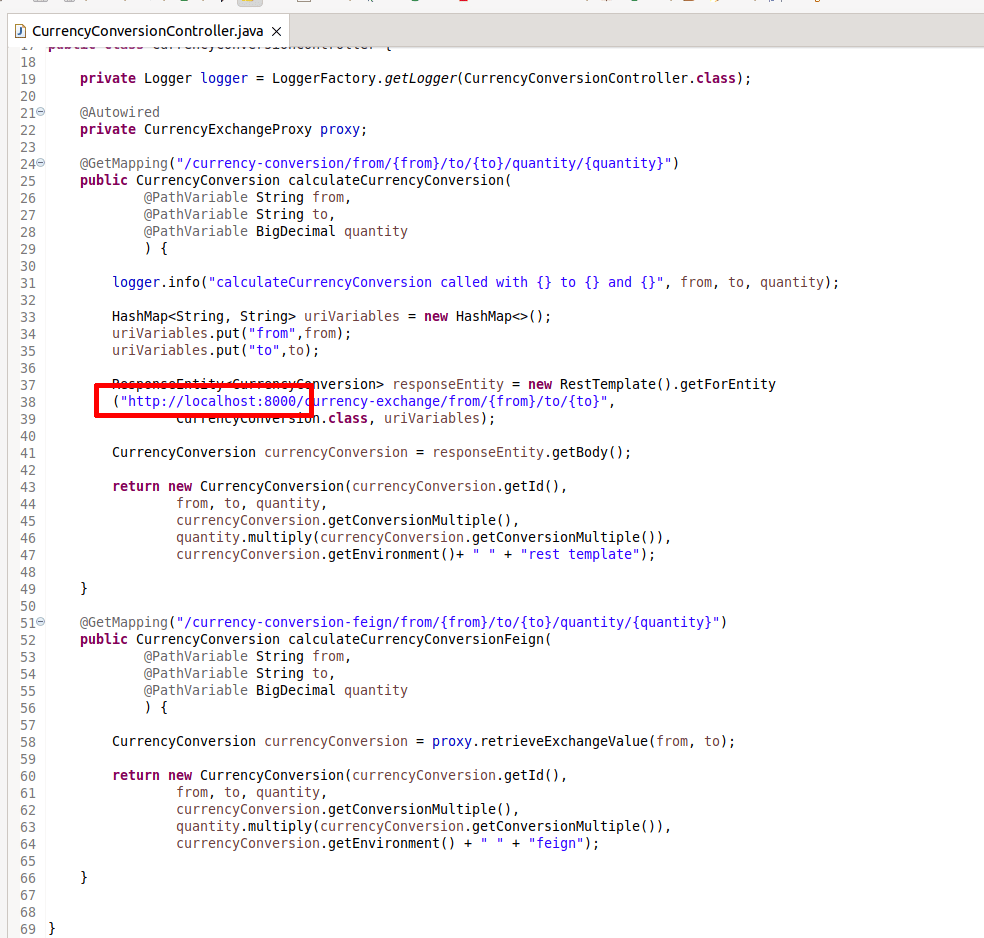
One option we have is create an environment variable and use an environment variable in here, or the other option is instead of localhost, you can say currency-exchange and using the service registry which is provided by Docker, internally you’d be able to use that to call the application. Instead of localhost, currency-exchange. It’s not really important. We have currency-conversion-feign working and this is what we would be using here on to test the currency-conversion-service.
Everything working, amazing!!!
So far we have seen the new changes introduced in version 2 and as Spring Cloud has evolved, we still have one last point to see.
In the next post we will see Kubernetes with Microservices using Spring Boot and Spring Cloud v2.


Leave a Reply
Want to join the discussion?Feel free to contribute!