Specify base image
FROM node:16-alpine

First of all, as we indicate in a previous post, this application has a learning goal and in a real application, it would surely not be structured as we have done.
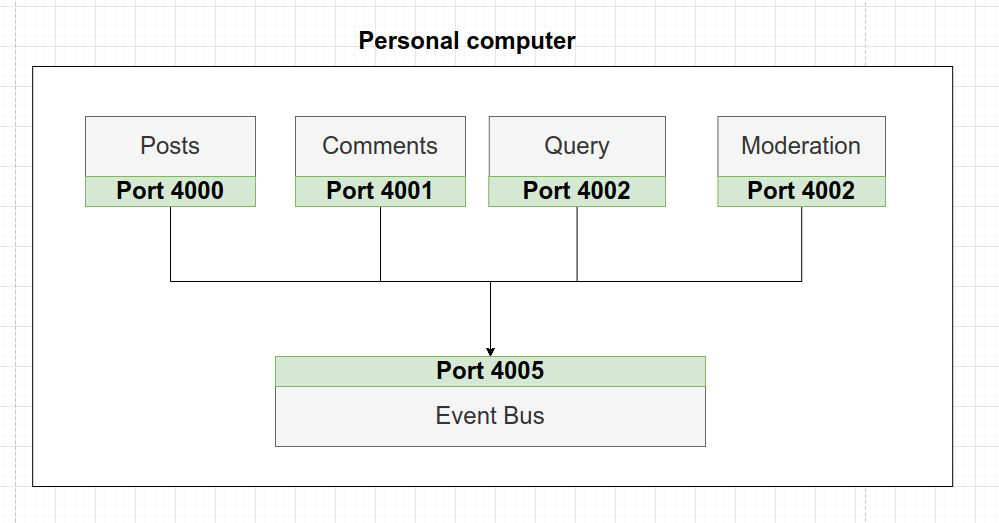
In the application mentioned above, the communication between services is done by indicating http://localhost and the corresponding Service Port as URL, this works correctly. But now, we want to deploy the application online. So, we must rent a virtual machine in one of the existing options: Digital Ocean, AWS, Microsoft Azure, Google Cloud, etc…
Now, let’s think about the new scenario when deploying the application online. Our blog begins to receive thousands of visits and the users overload the Comments Service by creating comments. Consequently, to respond to all this high demand we are forced to create new instances of the service.
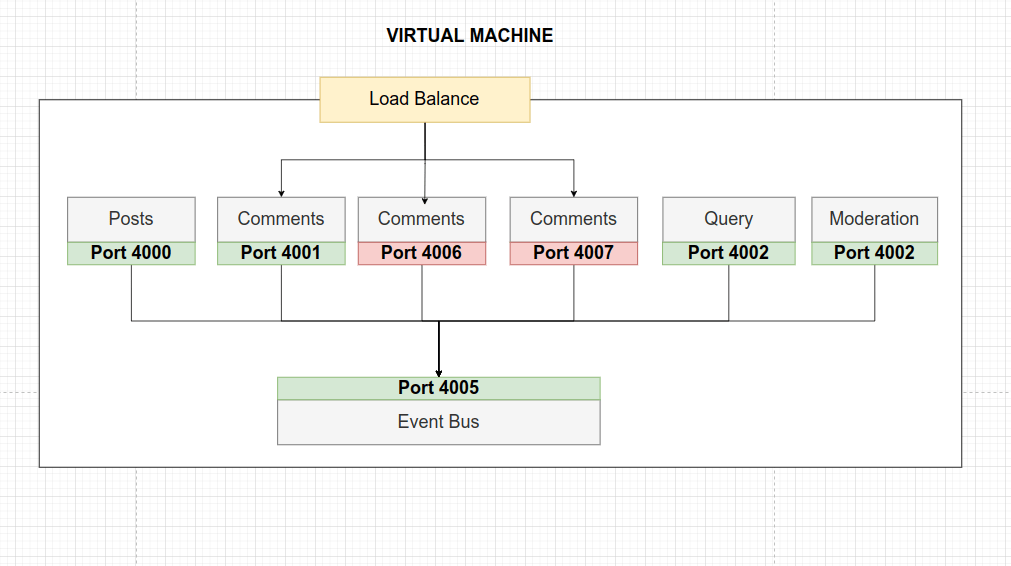
During the creation of the new instances, we must assign them a new listening port to establish communication with the Event Bus and we must implement the necessary code in Event Bus to communicate with these new services ports. As a result, we are going to create a strong coupling between the components. Every time we want to add new service instances we must stop the application, modify the code and deploy again.
At the same time, when creating new service instances, we are overloading the virtual machine. As a solution, we could rent another virtual machine to deploy the new instances and avoid this overload. But again, we must tell Event Bus how to reach the IP address of this new machine and the corresponding services. A really tedious job.
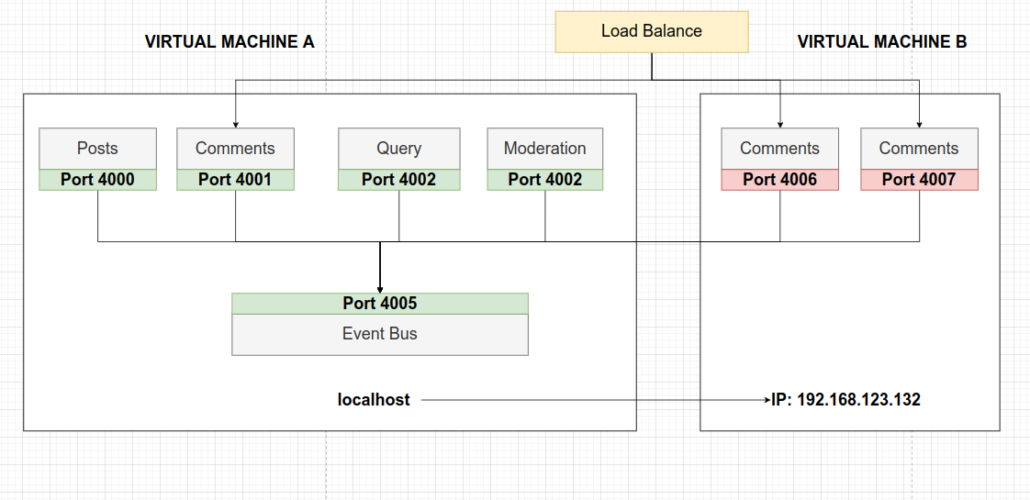
In addition, if we want to manage these new instances on demand (turn them on or off during certain hours of the day), we need to implement a condition in the code so that Event Bus knows when it can communicate with them. This is all too complex, and too confusing, and there’s probably no way we’re able to accomplish this very easily. In conclusion, this is not an ideal solution.
With Docker, we are going to create containers. A container is like an isolated computing environment that contains everything that is required to run one single program. So if our services are to function as independently as possible, this will encourage this behavior.
On one hand, containers wrap up everything that is needed for a program and how to start and run it.
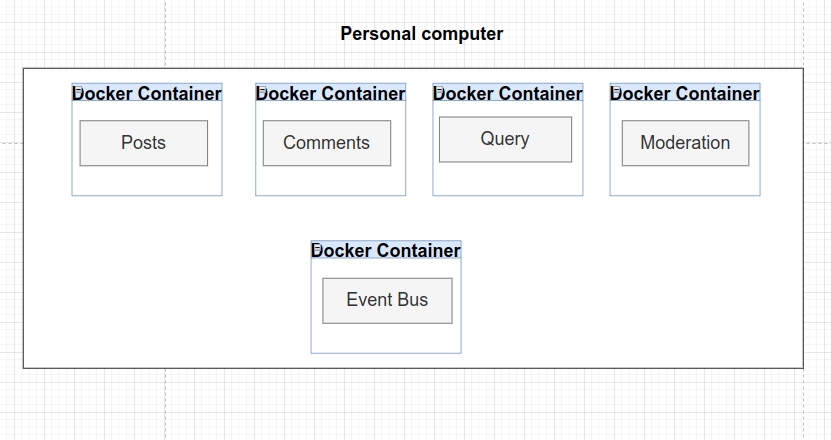
On the other hand, in case of needing more instances of a particular service, Docker allows us to create new containers of the same service.

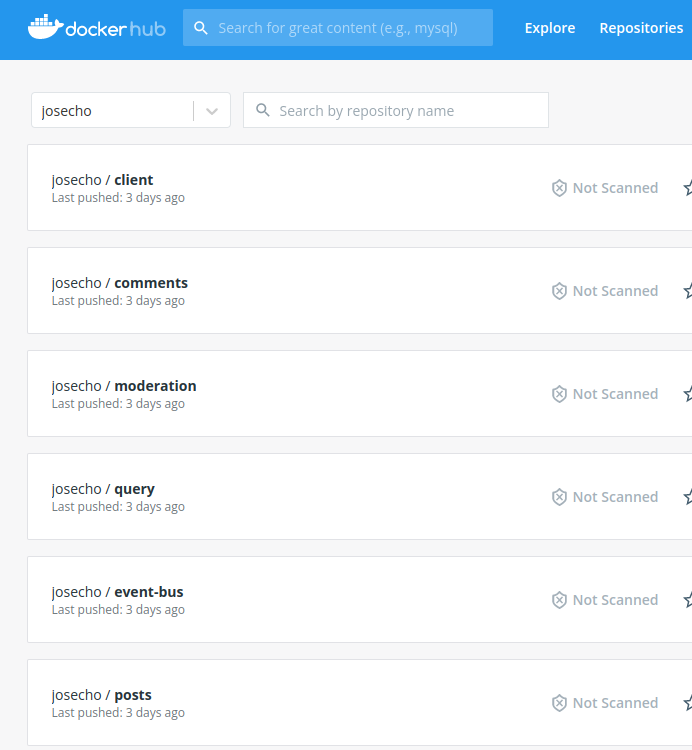
The ease that Docker has to run a program is something that allows it to work very well with Kubernetes. To follow this path we have dockerized all services creating a Dockerfile in each service.
Besides, to exclude from the build process all existing dependencies in the node_modules folder,we have created the file .dockerignore in all services.
As the introduction indicate that Kubernetes, also known as K8s, is a tool for running a bunch of different containers. Firstly, we give it some configuration to describe how we want our containers to run and interact with each other. After that, it will be in charge of establishing communication between the services and, if necessary, scaling the application by creating new containers according to demand.
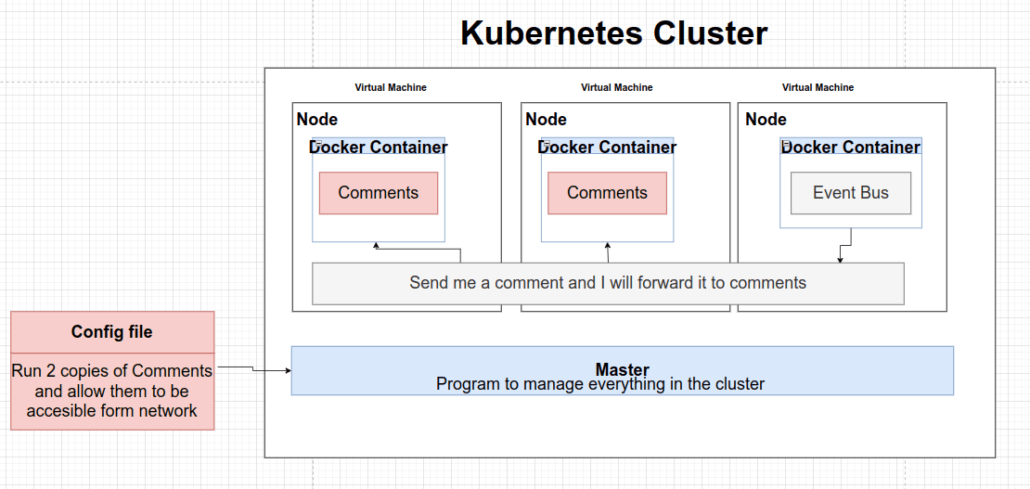
As we said, with the configuration files we will indicate to K8s which are the different Deployments, Pods, and Services that we want to create. Generally, we will store these files in our source code because they will serve as documentation. In another hand, it is possible to create these mentioned objects without the configuration files but it is not a recommended practice.

In order to be able to test these commands we have created a configuration file to define a Pod: post.old
For the purpose of processing the configuration file, we must change the file extension to yaml file extension.
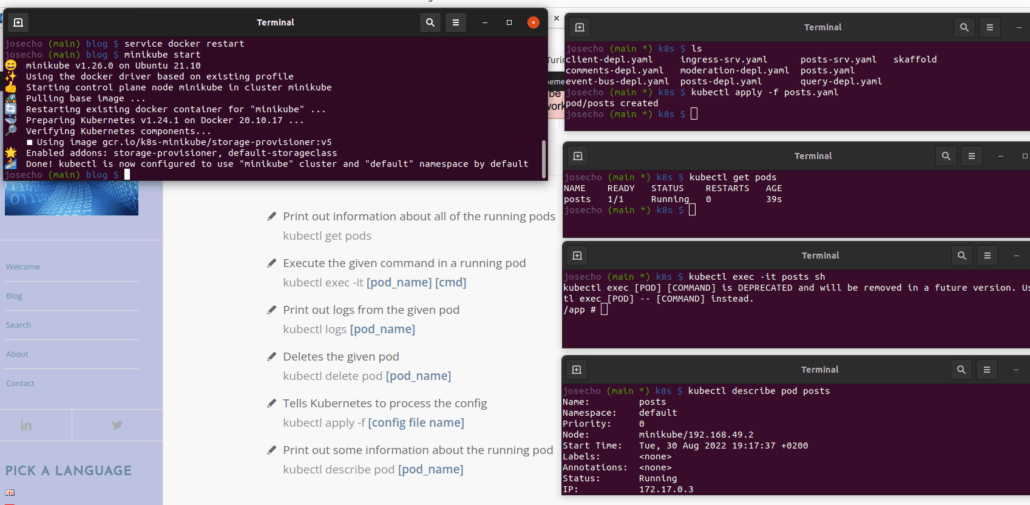
Finally, we need to remove the Pod and change the config file extension again (post.old), we just don’t usually create pods with this style of the config file.
kubectl delete pod posts
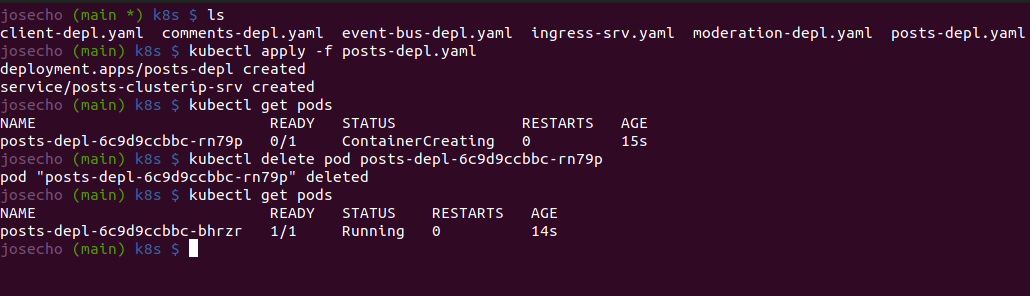
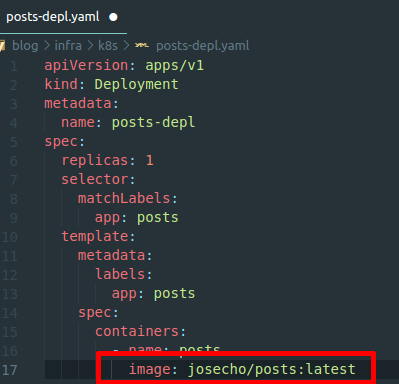
Rather than creating these Pods directly, however, we’re usually going to create something called a Deployment: post-depl.yaml
This type of object will be in charge of creating the Pods, updating their versions, etc…
If we create a Deployment and delete the Pod it has created, then it takes care of recreating it for us. To eliminate the Pods associated with the Deployment we must eliminate the Deployment.
cd /posts
Make a change to the file index.js
console.log('v2');
cd /posts

docker build -t josecho/posts:0.0.5 .
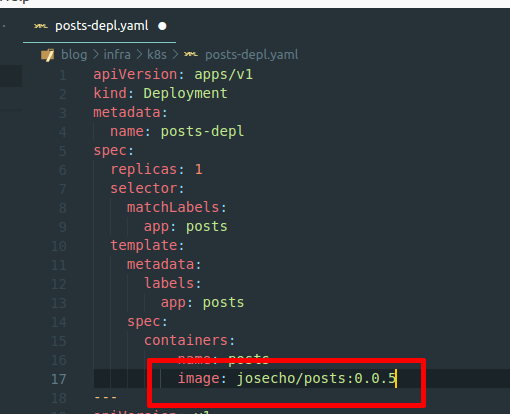
kubectl apply -f posts-depl.yaml
cd /infra/k8s
It is not necessary to specify :latest , it is also valid to indicate it in this form image: josecho/posts
kubectl apply -f posts-depl.yaml
cd /posts
Make a change to the file index.js
console.log('v3');
docker build -t josecho/posts .
docker push josecho/posts
kubectl rollout restart deployment posts-depl
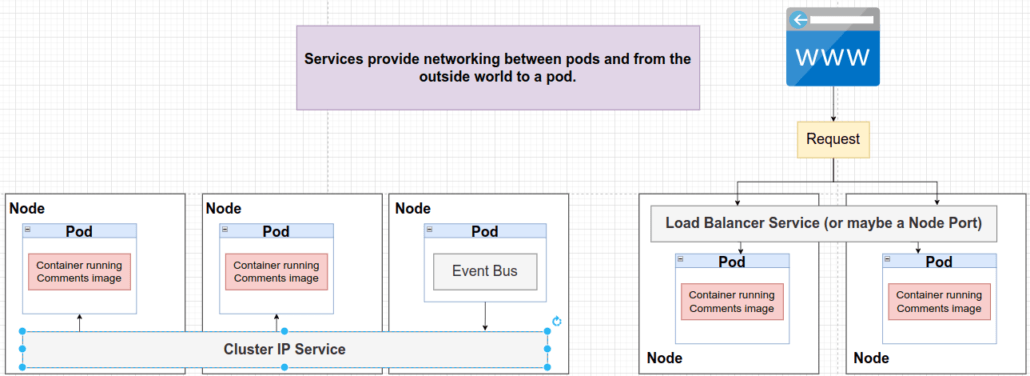
Generally, on a daily basis we will only use Cluster IP and Load Balancer services.
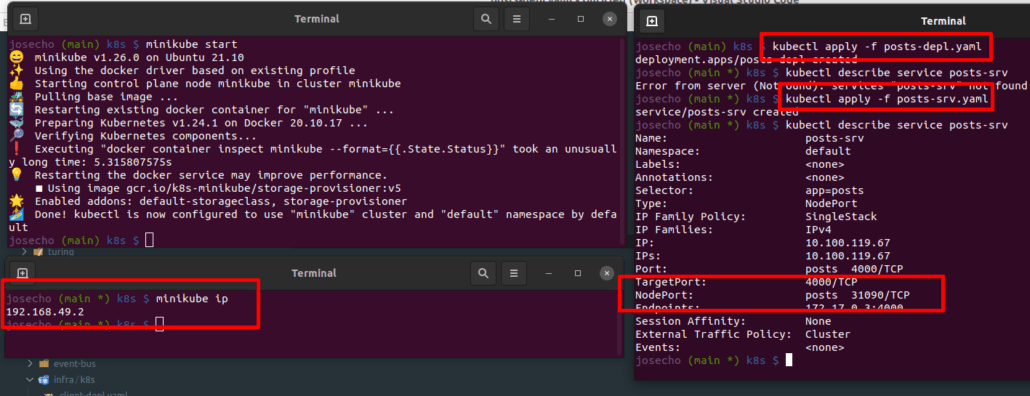
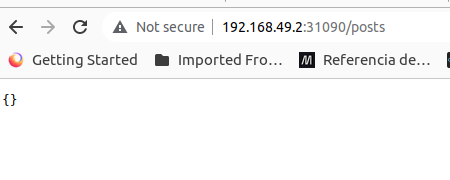
If we use GNU/Linux as the operating system then Docker will use Minikube. Therefore, on our personal computers, we must access the IP used by Minikube. For other operating systems, the IP address will be localhost: localhost:31090/posts.
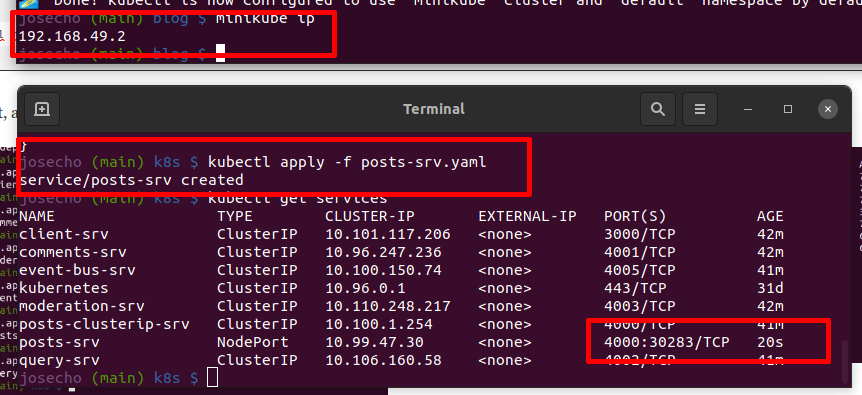
In the image shown below, we can see how the NodePort-type service is created through its configuration file.
Then, we access it through the browser.
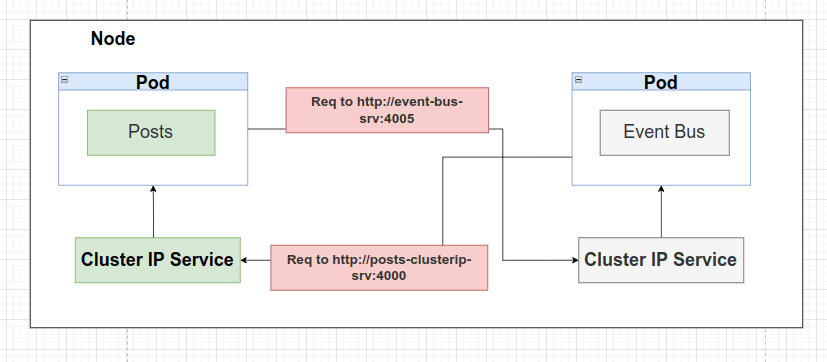
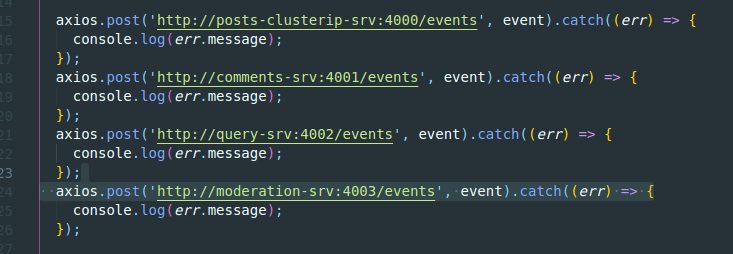
Instead of communicating with a pod via a URL made up of localhost and the service’s port number (http://localhost:4005), we’ll configure an easy-to-remember URL.
cd event-bus

docker build -t josecho/event-bus .

cd posts

docker build -t josecho/posts .
cd event-bus

 docker push josecho/event-bus .

 cd posts

docker push josecho/posts

cd /infra/k8s

kubectl apply -f post-depl.yaml

kubectl apply -f event-bus-depl.yaml

kubectl get pods

kubectl get services
We will no longer use localhost as part of the URL.
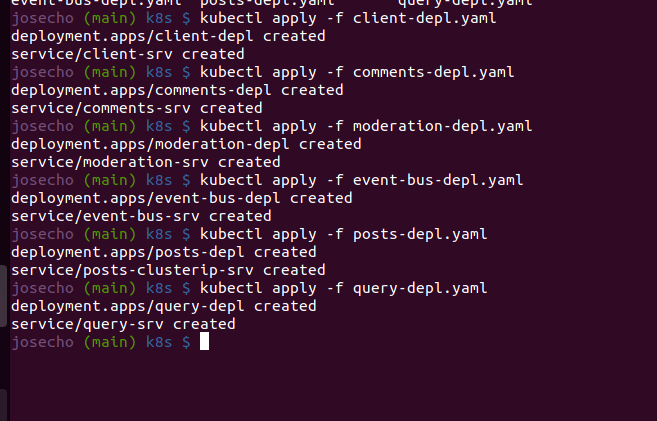
Of course, we will follow the same steps with all application services .
kubectl apply -f [deployment name]
At this point, all pods will be created with their associated IP Cluster Services.
We must not forget to upload images to Docker Hub and update Deployments when necessary.
docker push [ìmage name]

 kubectl rollout restart deployment [deployment name]
As we mentioned earlier, Node Port Service is used for development purposes, let’s go there.
kubectl apply -f post-srv.yaml
First, with the Postman tool, as shown in the following image, we create a post.
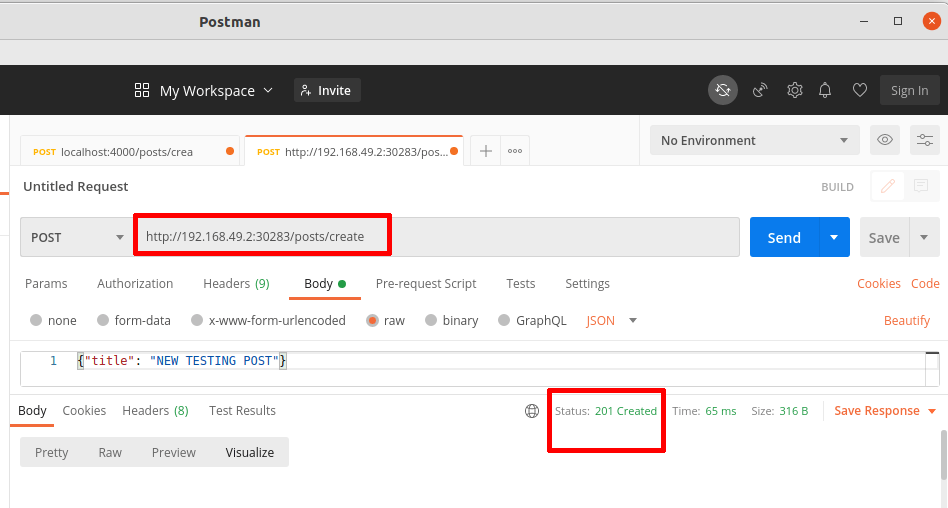
After that, Comment Services must receive an event about post creation. So, we check it in the pod log.
kubectl logs [pod name]
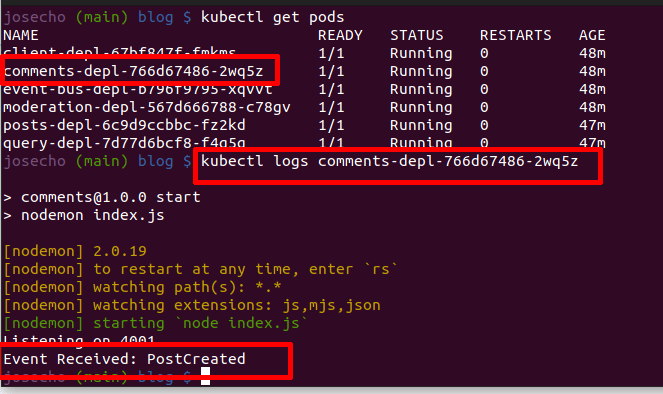
Finally, the service has received the Event. So, communication is working.
When a user opens their browser and navigates to our app for the first time, their browser will connect to the React app development server. The goal of this development server is to generate HTML, JavaScript, and CSS files from the code that we have written in our React application. So, in response to the user’s browser, these files are served to it, and the React app is launched inside the browser.
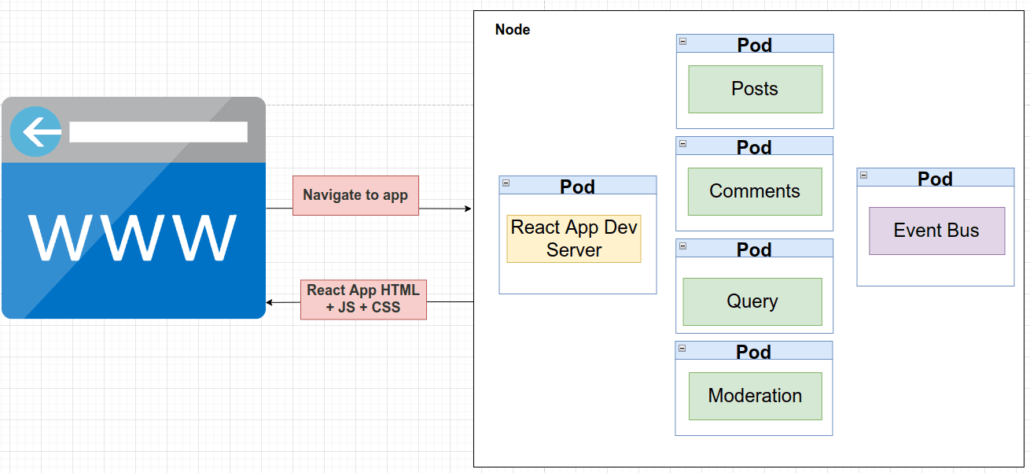
In any case, what React app development server is not doing is making any request at any point in time over other services.
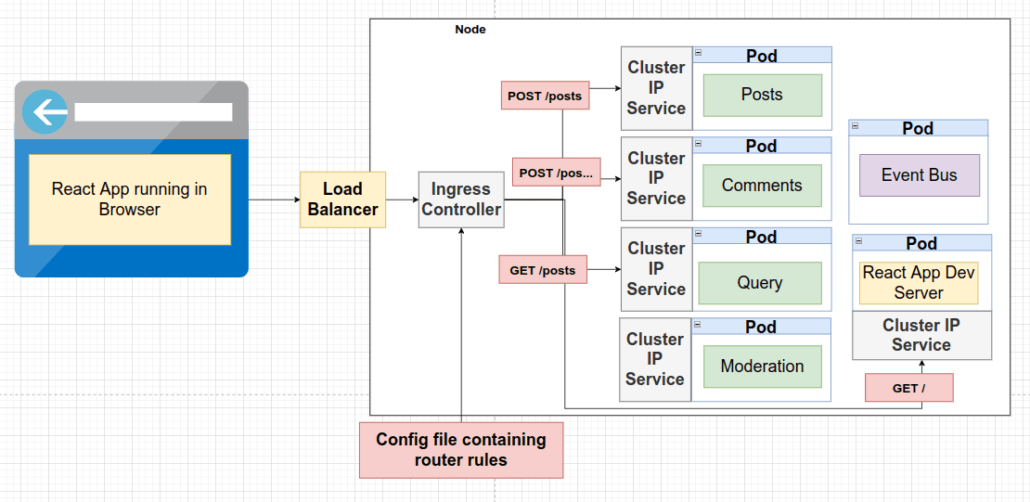
So, other components are responsible for handling the traffic. For this diagram, we’ll just say that we’re going to send traffic to the pod.
About the relationship between the Load Balancer and the Ingress Controller, in a very simplistic way to make it easy to understand let’s say that:
It is just about getting traffic to our cluster. Tell Kubernetes to reach out to its provider and provision a load balancer. Get traffic in to a single pod.
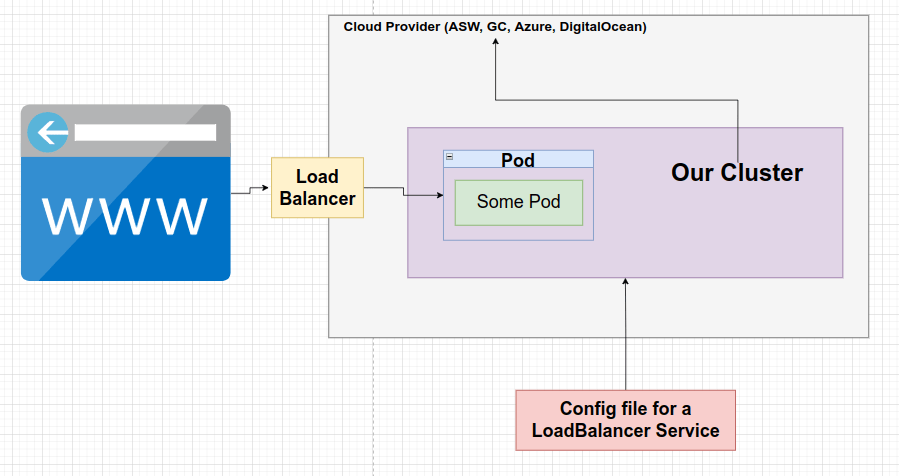
A Load Balancer Service is going to tell our cluster to reach out to its Cloud Provider. So reach out directly to AWS, Google Cloud or Azure and provision something called a Load Balancer. It exists completely outside of our cluster and it is a part of Google Cloud or AWS or Azure.
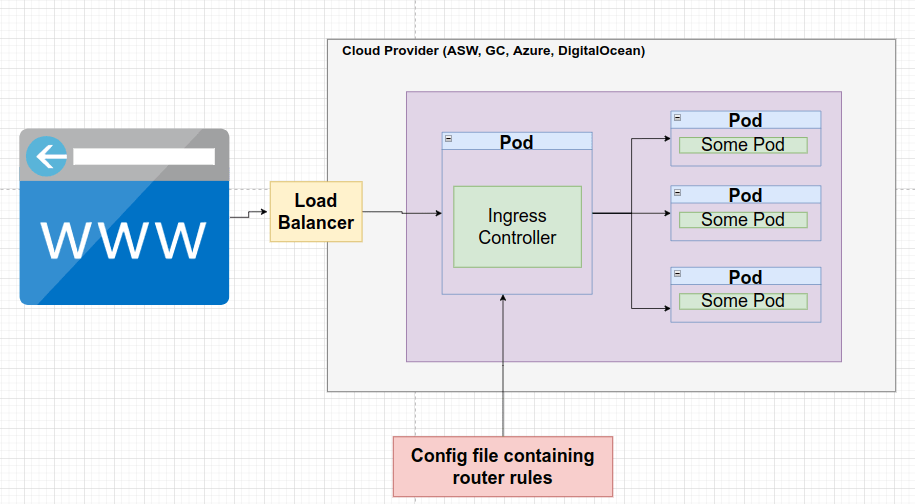
It is about routing rules or having some routing configuration that sends requests to the appropriate pod. A pod with a set of routing rules to distribute traffic to other services. Technically, an Ingress and Ingress Controller are two different things, but we’re going to kind of refer to them with interchangeable terms.
We are using Ingress-nginx, there is another project that does the same thing with an almost identical name Kubernetes-ingress. Check that you are installing Ingress Nginx and not Nginx Ingress, which is a totally different and incompatible library. Installation Guide.
In my case, I use GNU/LINUX as the operating system.
minikube addons enable ingress
#run to make sure the ingress-nginx-controller is in running STATUS.
kubectl -n kube-system get pods
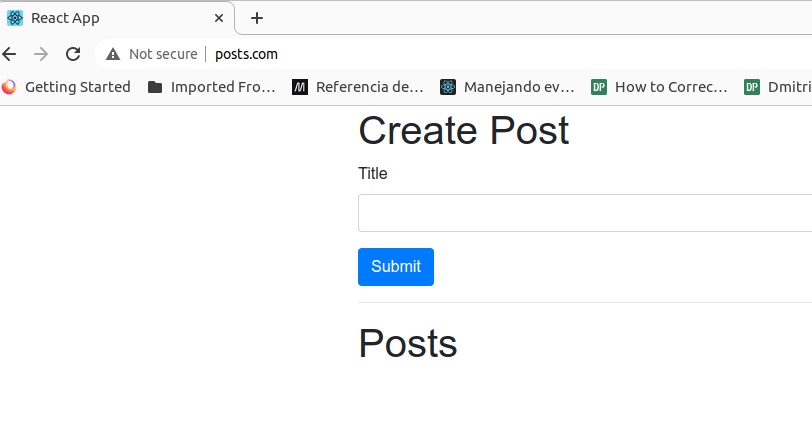
In the configuration file we set posts.com as the host.
spec:

    rules:

        -host:posts.com
In order for it to be recognized on our local machine, we must indicate it in the /etc/hosts file.
[minikube IP] posts.com
Then, we will apply the Ingress-nginx configuration.
kubectl apply -f ingress-srv.yaml
In the browser, the url of the indicated domain must respond correctly.
Our app works fine within our cluster, which is great. Everything is running inside our personal computer in our development environment. But, making changes to our code base is a real pain, an unpleasant development process. So, when we are developing code actively inside of a cluster, we are going to instead use a tool called Skaffold.
Skaffold is a command line tool that we’re going to use to automatically do a lot of different tasks in our Kubernetes dev environment. Specifically, we can use Scaffold in a production environment, but we’ll only focus on using it in development. What we like most about Skaffold is that it makes it very easy to update code in a running pod.
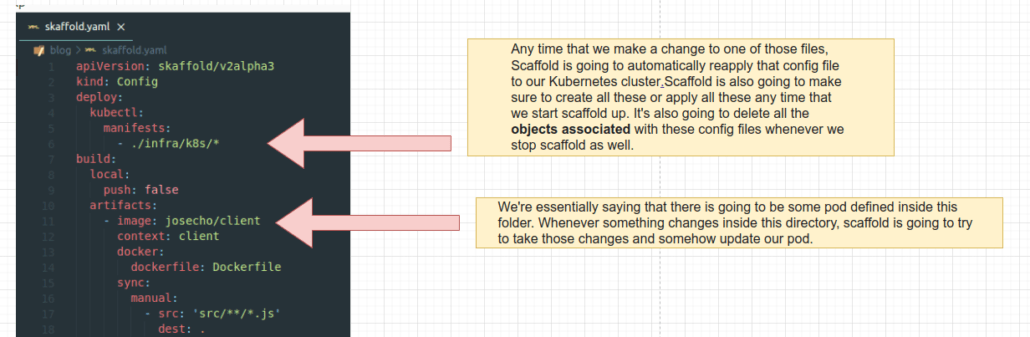
This config file is going to tell SKaffold how to manage all the different subprojects inside our cluster.
To start up Skaffold we will run:
skaffold dev
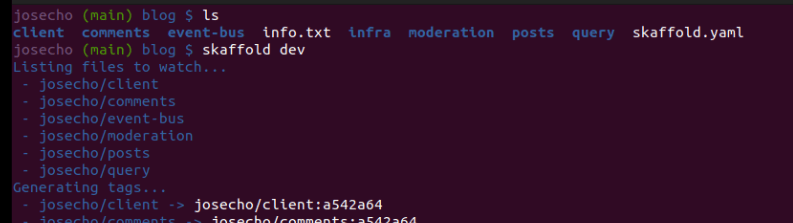
Amazing, everything working.
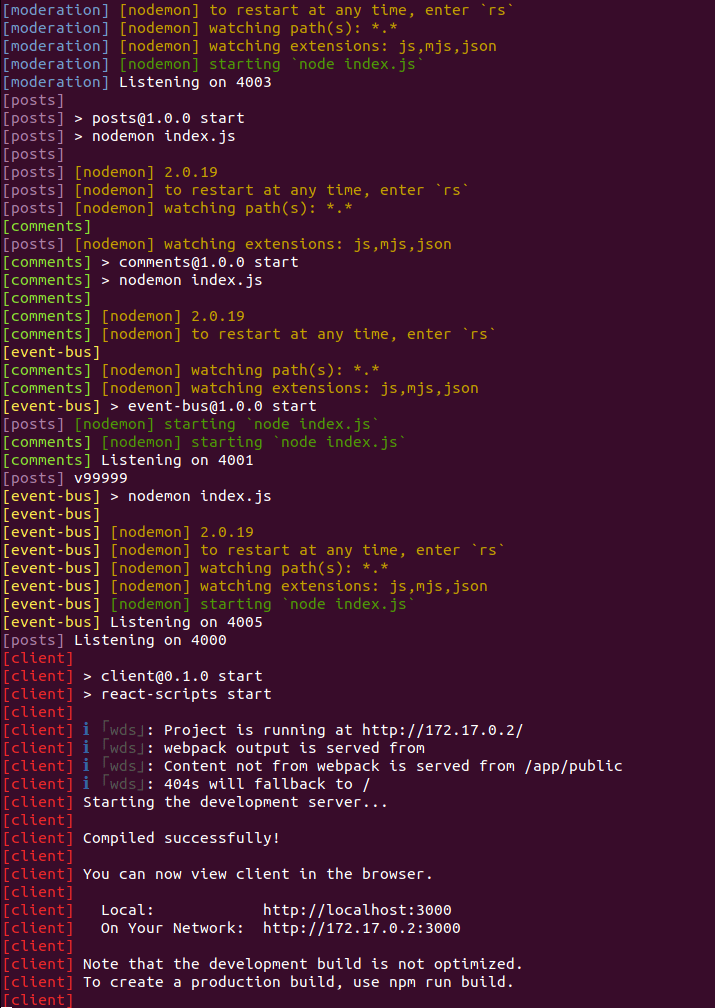
Any change we make will be reflected automatically, in our case updates are made at two levels. On the one hand, we have Nodemon working, and on the other Skaffold.
So far we have run our application on the cluster that we have installed on our personal computer but we have not published the application online in any cloud provider. In the next publication, we will continue advancing on this topic.

 Google Cloud: Development Environment
Leave a Reply
Want to join the discussion?Feel free to contribute!