Don’t want to run Docker on our local machine at all anymore
We stop or uninstall the Docker client and run the following commands.
gcloud components install kubectl gcloud container cluster get-credentials [cluster name]

So far, we have made posts where we saw our applications running on a Kubernetes cluster on our personal computer. As an illustration: Orchestrating Collections of Service with Kubernetes.

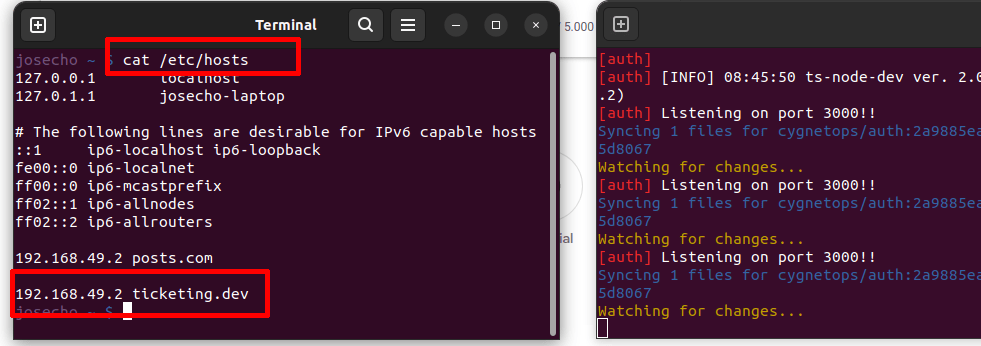
In the same way, we can see the application offered in the download section. Previously, we must download the code or clone it and indicate to our hosts file which is the IP address of the domain that we have configured. Then, in our local repository, we must switch to the branch called beforegooglecloud and run the command:
skaffold dev
The application will run on a Kubernetes Cluster installed on our personal computer.
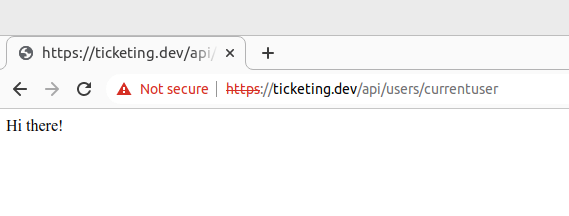
We are going to visit our domain, which we have configured inside our hosts file, providing in the URL a route defined in the API with the path /api/users/currentuser. Consequently, we will see a message that says ‘Your connection is not private again’.
This is because by default Ingress-nginx is a web server that’s going to try to use an HTTPS connection. Unfortunately, by default it uses what is called a self sign certificate. Long story short, Chrome does not trust servers that use self signed certificates. For those circumstances though, there is a bypass available. You can just type in thisisunsafe anywhere on the window and the browser will let you visit the page.
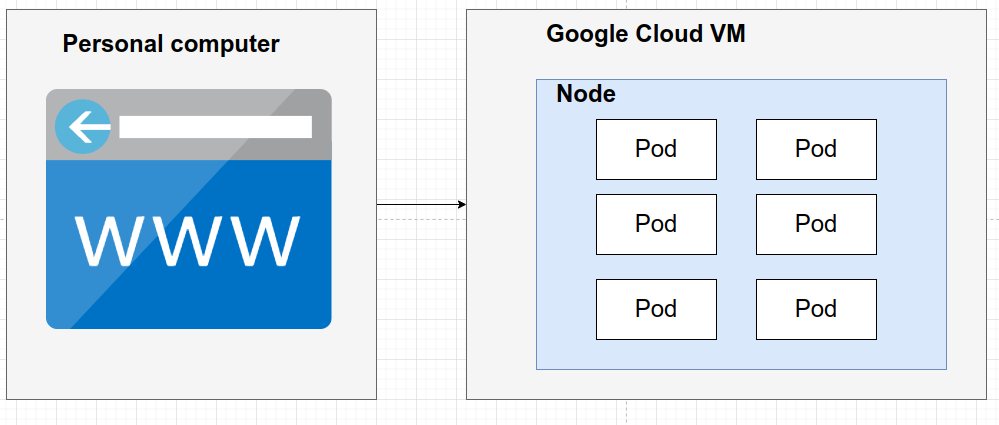
If we have many different pods running inside of our local cluster and we’re on a older computer, this old machine will start to slow down.
As a solution, we can create the development environment through Google Cloud and stop using this environment on our local machine.
Skaffold is going to be the real tool that’s going to allow us to set everything up on Google Cloud very easily. This tool was actually developed by teams at Google, so Skaffold has a very tight integration with Google Cloud in general.
This client-side tool is not only going to create all of our different services and deployments and all that stuff, it is also in charge of handling changes that we are making to our project as well. We must know that there are two types of changes that we can make to a file or project.
So if we look at the scaffold configuration file, the sync section defines a pattern about locating a list of files.
sync:

    manual:

         -src: 'src/**/*.ts'
Whenever we made a change to a file whose location matched that pattern, we simply took that file and synced it to the corresponding pod within our cluster.
So in that scenario, we weren’t rebuilding any image or anything like that. We were just taking the change file and putting it directly into a pod.

When making a change to a file that is not listed in the sync section, for example package.json, this change will not be injected into the Pod.
Whenever we make a change to the package.json file, that is a sign that we want to completely rebuild our image and then update some corresponding Deployment inside of our cluster.
Skaffold will detect that and it’s going to add in an extra step. It is going to reach out to a service that runs inside of Google Cloud called Google Cloud Build.
This service is all about building docker images, so Skaffold is going to take all of our source code for our project that’s going to upload it to Google Cloud Build along with the Docker file for that specific project. Then, on Google Cloud Build, some builder process is going to build our image for us.

The whole reason that the image is being built on Google Cloud, it just so we decrease the number of resources that are being consumed on your local machine. In addition, building the image is going to be a lot faster because Google Cloud servers have extremely fast Internet connections.
First we must create an account in Google Cloud. If it is the first time we do it then we will get $300 in free credit.
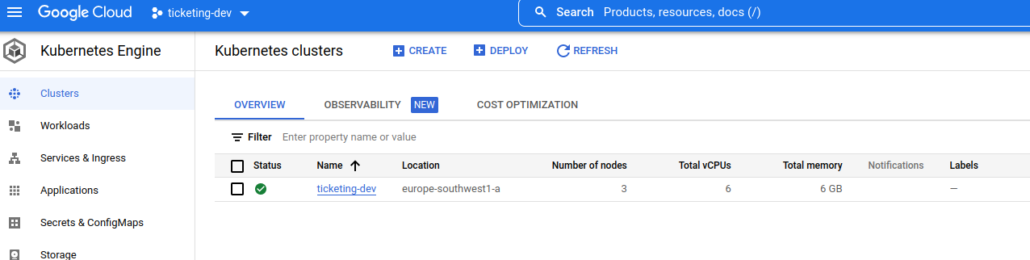
After creating the project, the Kubernetes Engine section will allow us to create a cluster.

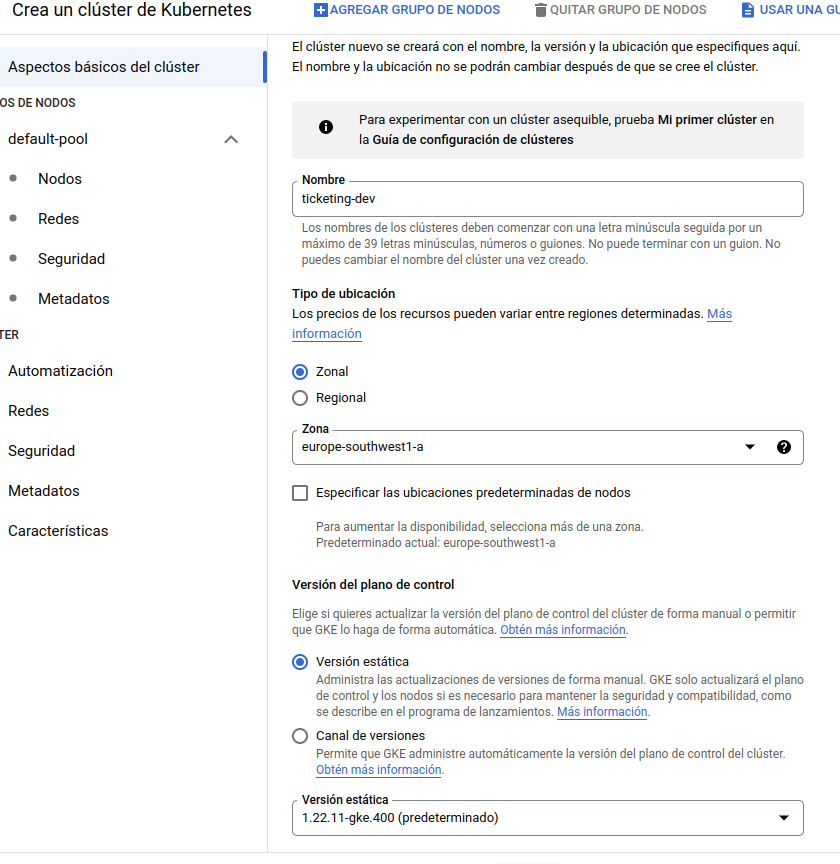
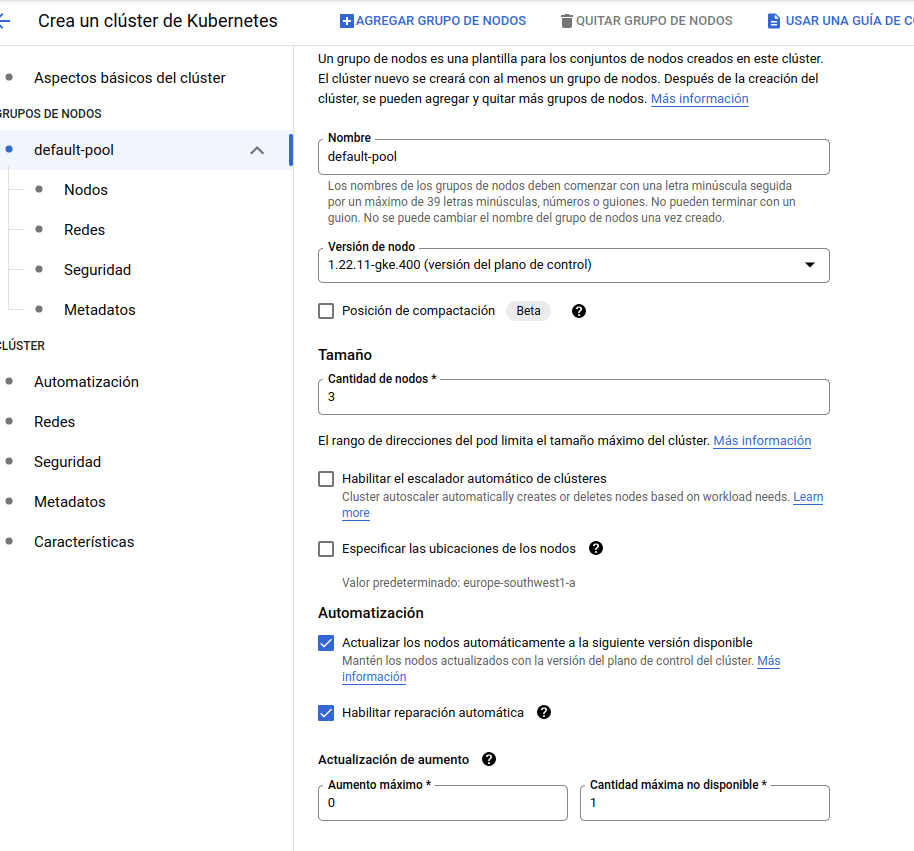
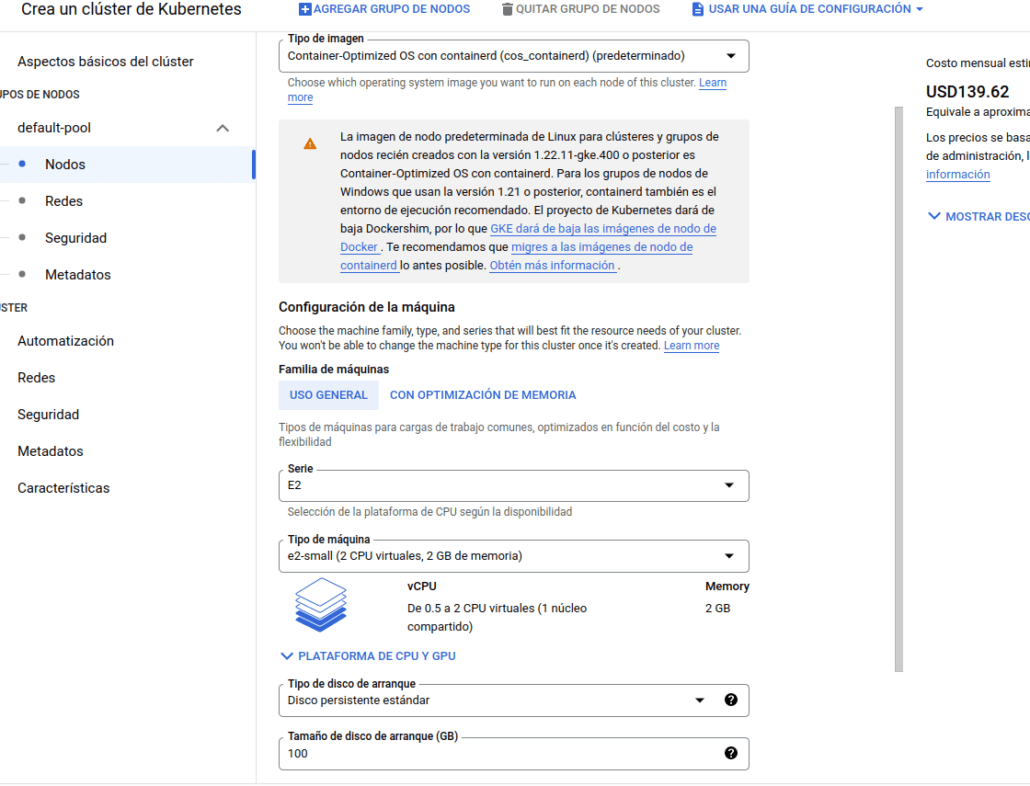
At the end of the process we can see all the characteristics that we have defined in the creation of the cluster.
On our local machine we have a Kubernetes cluster running.
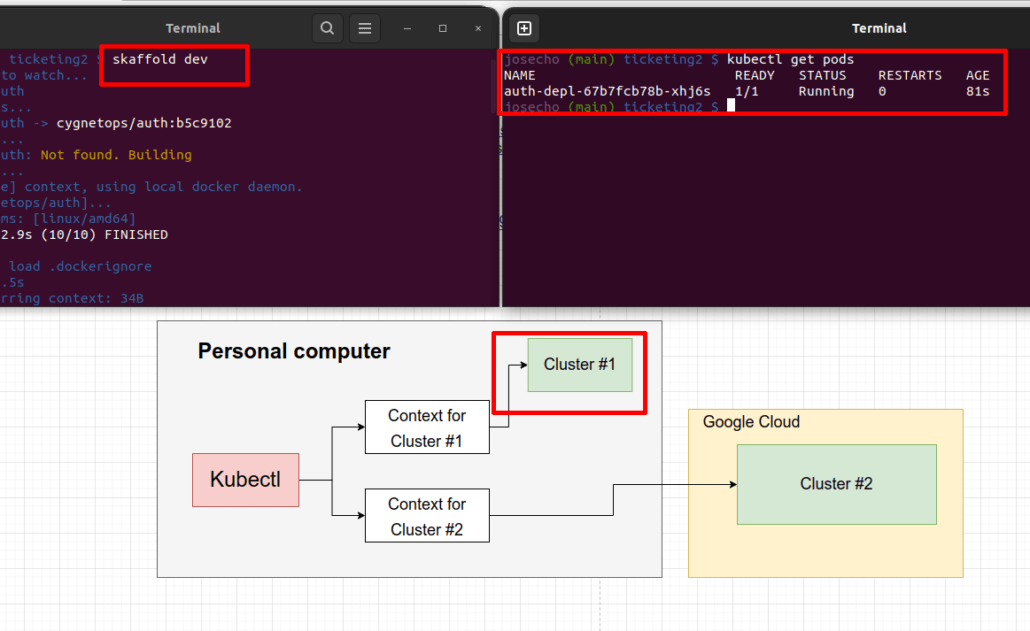
Behind the scenes, kubectl uses something called context. kubectl can be thought of essentially as some different connection settings. They list out some authorization credentials, some users, some IP addresses, a lot of different information to tell kubectl how to connect that to different clusters that exist in the world.
Right now, we are connecting to our local cluster through a context that was created when we first installed Docker for Windows,Docker for Mac or Docker for GNU/LINUX on your machine.
To continue advancing, now we must connect to the cluster that we have created in the cloud. It is time to add a new context that’s going to tell kubectl how to connect to the cluster that we just created in Google Cloud.
The easiest way to connect to the cluster is to install a tool called the Google Cloud SDK. This is a command line tool that we can use to interact with Google Cloud automatically. The Google Cloud SDK does a bunch of different things, but one thing it does for us is create these different contexts for us automatically and update on our local machine and teach it how to connect to the clusters we’re creating in Google Cloud.
So now that we’ve got Google Cloud SDK installed, we’re going to first log in to the Google Cloud.
gcloud auth login
After that we’re going to run another command that’s going to initialize the Google Cloud SDK and tell it a little bit about our particular project that we’re trying to run.
gcloud init
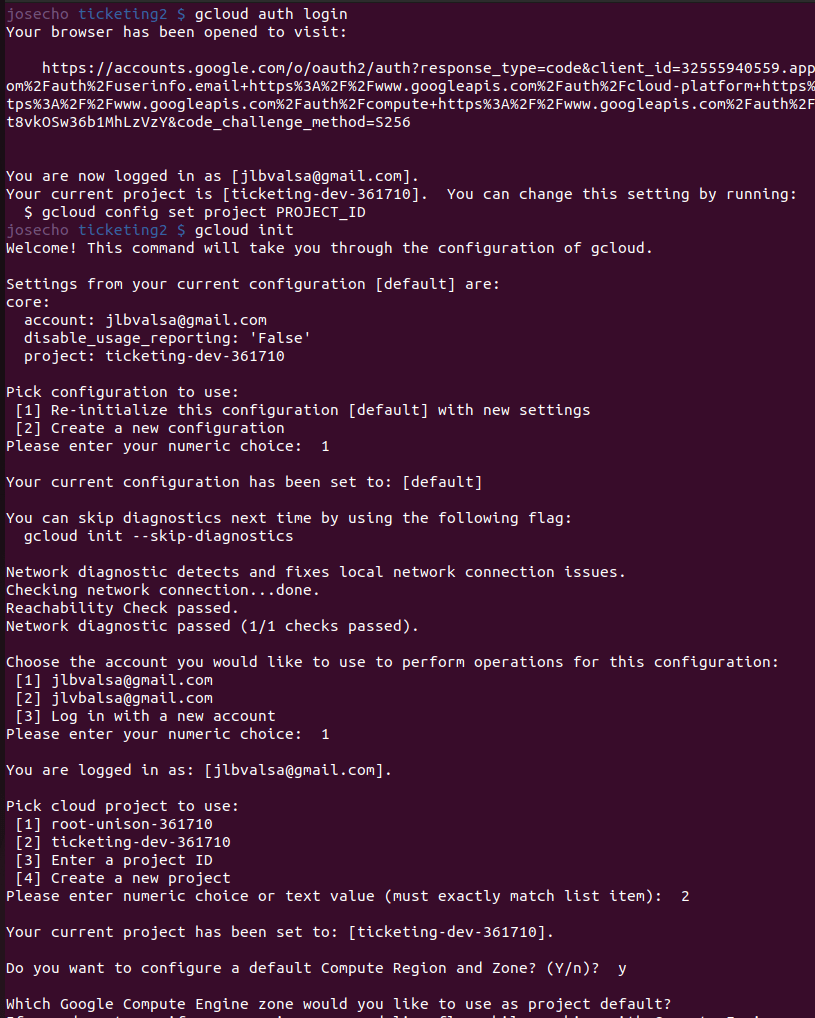
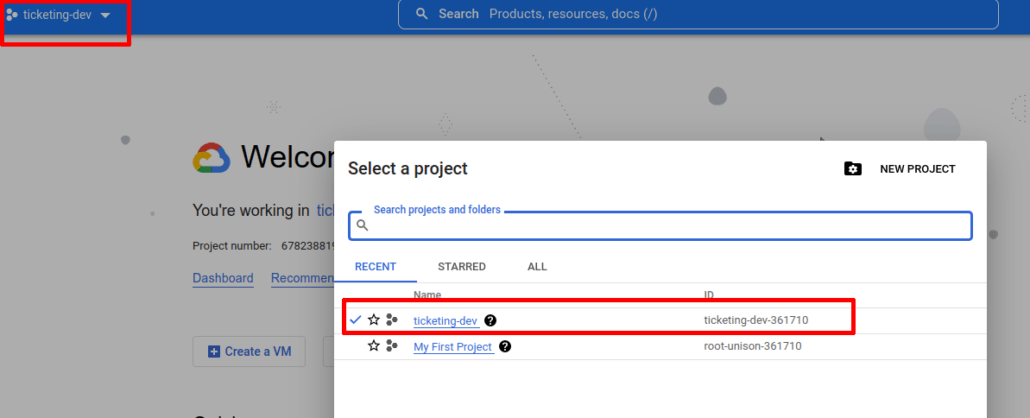
When the process asks us for the name of the project, we can find out its name as shown in the following image. In our case: ticketing-dev-361710
Depending on whether or not we have enough resources on our local machine, we will have to make a decision.
In our case we chose the second option, therefore we execute the command:
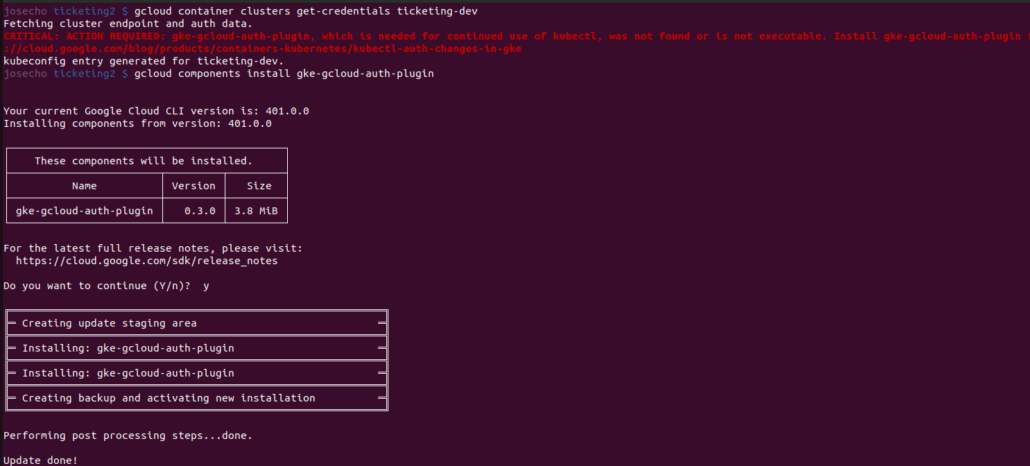
gcloud container clusters get-credentials ticketing-dev
I must indicate that when we created the Kubernetes cluster we have assigned the same name as the project.
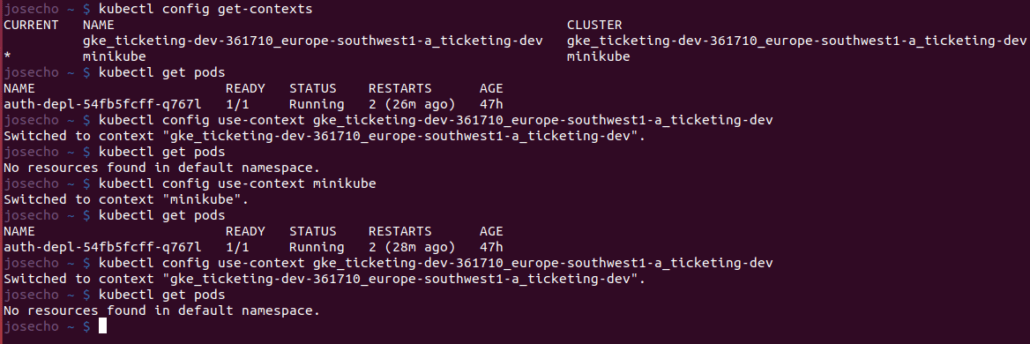
As we can see in the following image, now on my computer there are two contexts. The context of the local cluster and the context of the cluster created in Google Cloud. Consequently, I can select the one I want to use.
kubectl config get-contexts

kubectl config use-context [context name]
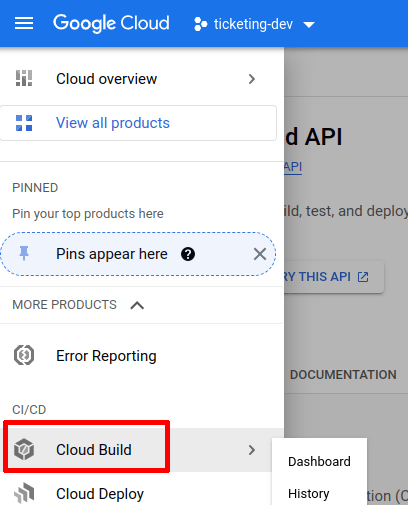
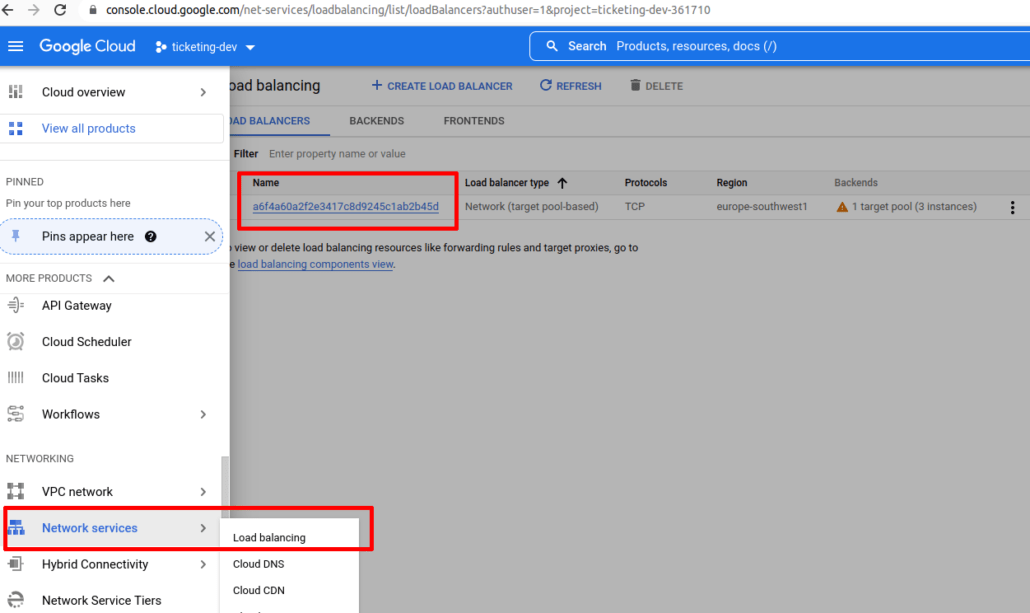
So back at my Google Cloud console, we’re going to go to the menu in the top left. Then we will scroll down quite a bit until we find the Cloud Build option menu. We will select Cloud Build option and then we’ll click on Enable button.
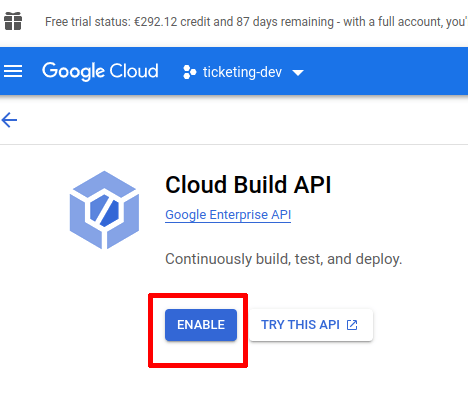
And that should be it.
So that we can appreciate in detail the changes that we must implement, we have created a branch called googlecloudcontext. We are going to tell Skaffold that we want to use Google Cloud Build.
We must specify the project id and we we need to specify the image name that Google Cloud Build is going to assign to our image when it gets built.
The formats that Google Cloud Build uses to decide what to call your image is always the exact same format. It is always going to be us.gcr.io/name-project. So we’re going to put the name of the project ID and after that we’ll put in the name of our project directory.
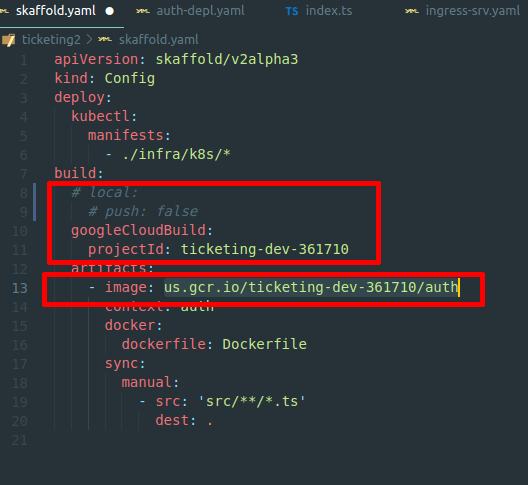
On the other hand, we must also comment out the code that references the image when working in our local context and update the auth Deployment with the new image name.
Setup ingress-nginx on our Google Cloud cluster.
In the official documentation we can follow the steps to take depending on the operating system we have, in our case GNU/LINUX, which means that we will talk about Minikube. We’ll notice that there is a little bit of additional setup that we have to go through if we are using Google Cloud.

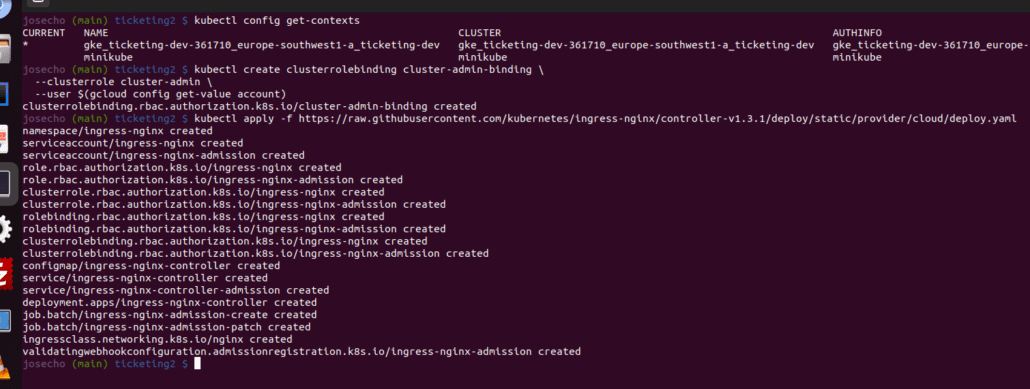
Before to start, we will check that we are in the correct context running the command:
kubectl config get-contexts
First, your user needs to have cluster-admin permissions on the cluster. This can be done with the following command:
kubectl create clusterrolebinding cluster-admin-binding \ --clusterrole cluster-admin \ --user $(gcloud config get-value account)
Then, the ingress controller can be installed like this:
kubectl apply -f https://raw.githubusercontent.com/kubernetes/ingress-nginx/controller-v1.3.1/deploy/static/provider/cloud/deploy.yaml
So the commands that we just executed created two things for us. It created first a Ingress Controller, that’s the thing that runs inside of our cluster that has some of our routing rules tied to it.But it also created something else called a Load Balancer.
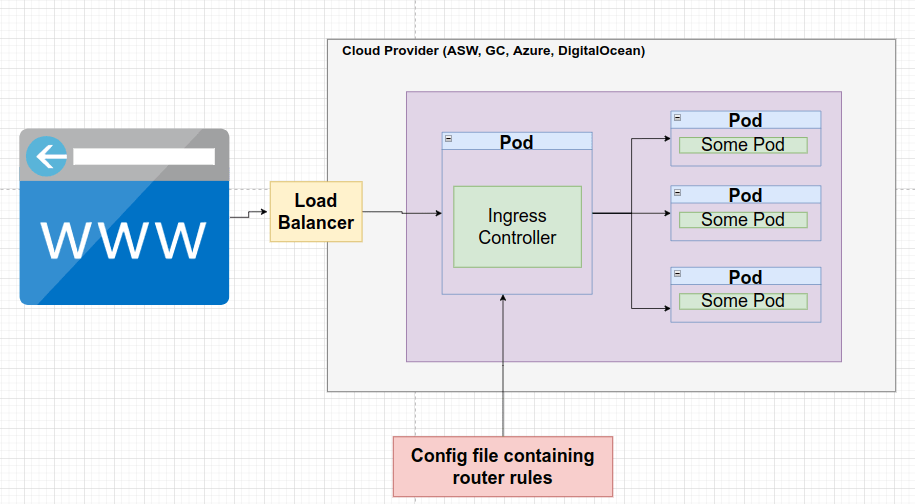
Load Balancer is tied directly to Google Cloud.It’s essentially a Google Cloud thing that is running outside of our cluster entirely. So whenever we want to connect to our cluster now, we really want to attempt to connect to this Load Balancer .
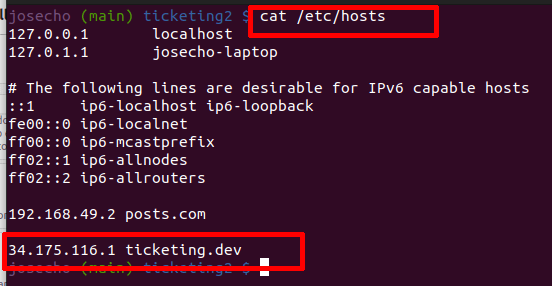
The Load Balancer has an IP address assigned.
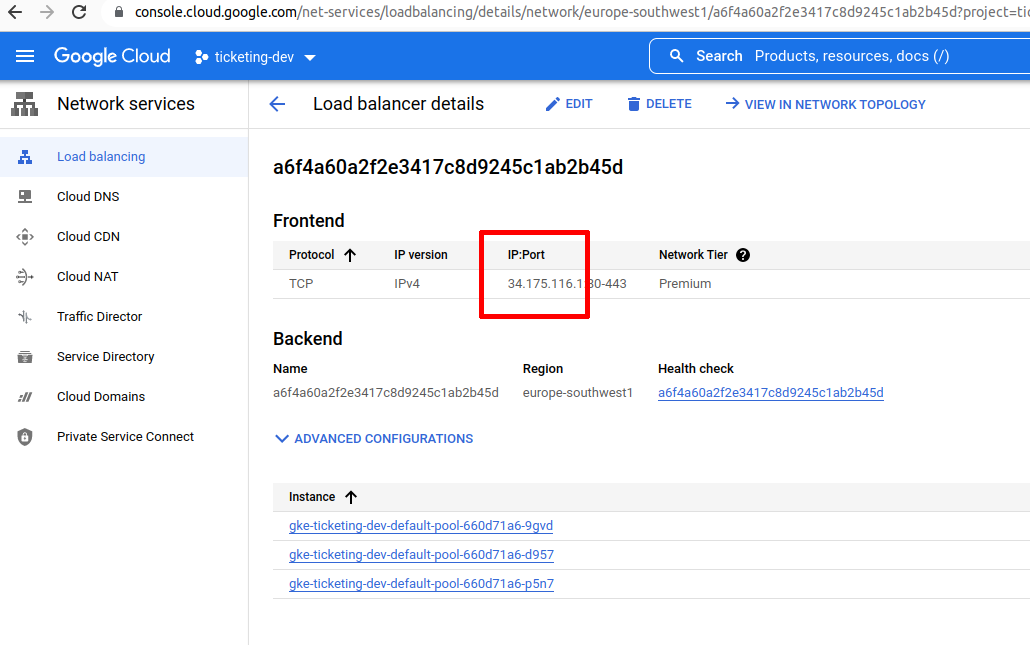
So that is the IP address that we want to tell our host file to connect to any time that we try to go to ticketing.dev.
We’re going to restart Skaffold at our terminal. As soon as we do so, Skaffold should attempt to build this image that we listed inside of our Skaffold config file using Google Cloud Build. It will then take our auth Deployment and the Ingress Service config file and apply them to our remote cluster.
skaffold run
We should actually be able to see the image build in process if we hop over to the Google Cloud Build dashboard really quickly.
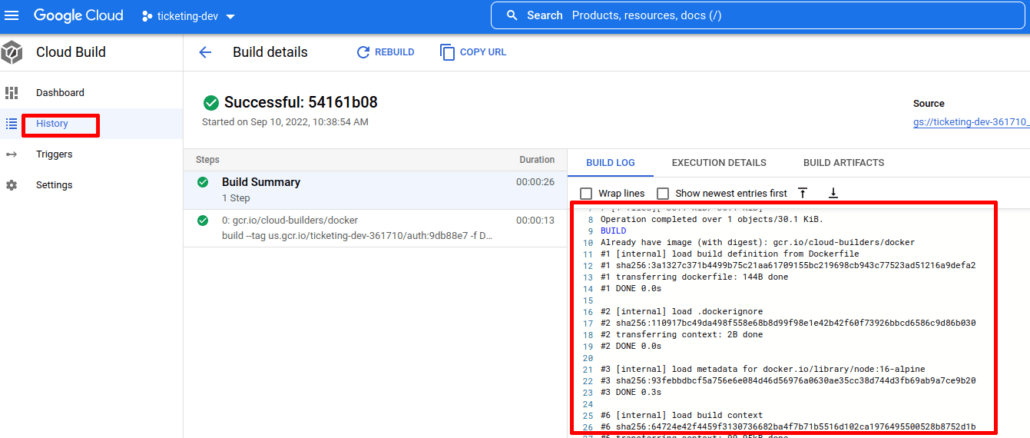
Every image gets built and then it’s pushed off to our repository of images on Google Cloud. So all these images are now being pushed to a Google Cloud repository. No longer are we making use of Docker Hub.
So now in theory, as we start to add in more pods, more deployments, more everything into our cluster. We’re not going to start slowing down our local machine anymore because all that stuff is going to be
created on remote machine.
Finally we are going to try one more time to visit our URL or our domain that we had set up within our host and we will try to reach our users current user path again.
We are going to see a message that says ‘Your connection is not private again’. Then we can just type in thisisunsafe anywhere on the window and the browser will let you visit the page.
All right, so this looks awesome.

 Error Handling on Microservices.
Leave a Reply
Want to join the discussion?Feel free to contribute!