
Creating a Production-Grade Workflow. Docker Compose.
Code download
# Create React app
npx create-react-app frontend
Necesary commands:
# Starts up a development server. For development use only
npm run start
# Run test associated with the project
npm run test
# Builds a production version of the application
npm run build
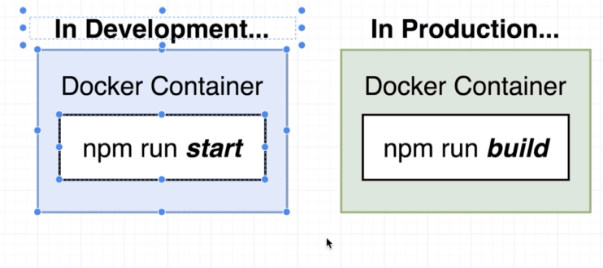
In Development
Dockerfile.dev file
Docker file is only used when we are trying to run our application in a development environment.
docker build -f Dockerfile.dev .
- Duplicating dependencies
When we just installed the Create React app tool and used it to generate a new project, that tool automatically
installed all of our dependencies into our project directory.
In the past we did not install any of our dependencies into our working folder.
Instead, we relied upon our Docker image to install those dependencies when the image was initially
created.
So at present we essentially have two copies of dependencies and we really do not need to.
The easiest solution here is to delete the Node Modules folder inside of our working directory.
- Starting the Container
docker run imageId -p 3000:3000
- Docker Volumes
So if we want to somehow get changes to be reflected inside of our container after we make them, we
need to either rebuild the image or figure out some clever solution.
Well, of course, we probably do not want to rebuild the image every time we make a change to our source
code.
We’re going to come back the next section and figure out a clever solution to make sure that any changes
that we make to our source code get automatically propagated into the container as well.
We’re essentially setting up a mapping from a folder inside the container to a folder outside the container.
Setting up a Docker volume is sometimes a little bit of a pain in the rear just because of the syntax we have to use when run «Docker run».
Docker run command at our terminal:
docker run -p 3000:3000 -v /app/node_modules -v $(pwd):/app imageId

Aditional flag:
-v /app/node_modules
Don’t try to map it up against anything, because we have previously deleted it to avoid duplication of dependencies
- Docker Compose
So clearly this is kind of a pain right now to run this command long form. And the whole purpose of Docker compose is to make executing Docker run easier. And so even though this time around we have a single container image or simply a single Docker image, we can still make use of Docker compose to dramatically simplify the command, we have to run to start up our Docker container for development purposes.
So let’s create a Docker compose file and inside that file we’re going to encode the port setting and the two volumes that we need to create inside of the container.
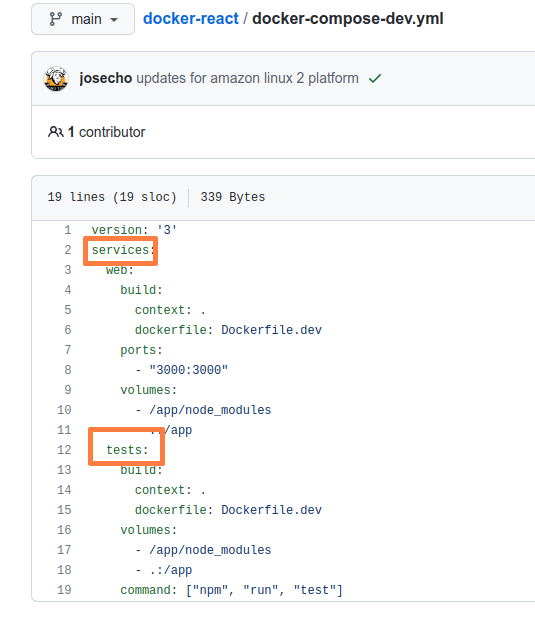
docker-compose-dev.yml file
docker-compose -f docker-compose-dev.yml up
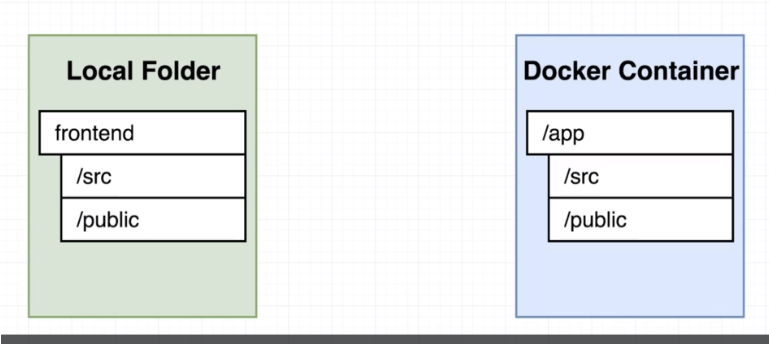
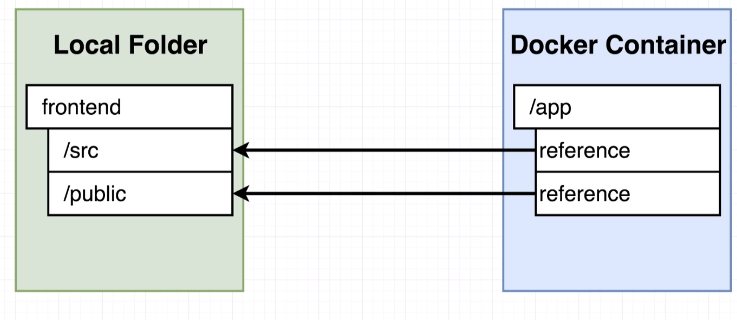
By setting up that volume mount in docker-compone-dev-yml :
| volumes: | |
| – /app/node_modules | |
| – .:/app |
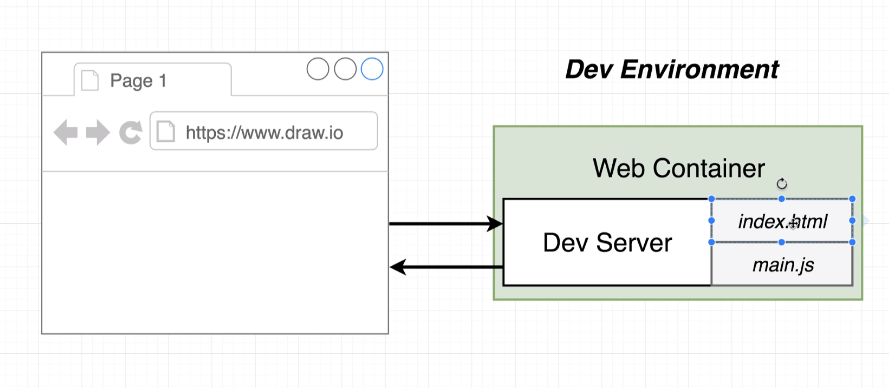
Any time that the Docker container looks into the app folder, it’s essentially going to get a reference back to all these local files we have on our machine.
COPY . .
Executing test
Travis CI: continuous integration service specifically made to run test for your project

docker build -f Dockerfile.dev .

docker run imageId npm run test

CONTROL + C

docker run -it imageId npm run test
You’ll notice that when we add on the flags, we get a much more full screen experience here and now.
We get full interactivity here.
But, again we have the problem that if we make changes to the tests they are not reflected in the container.
Now, we certainly could use a very similar approach of setting up some volumes in the same way that we just did inside of our Docker compose file a moment ago so we could set up a second service inside of here.
We could assign some volumes to it, and the entire purpose of that service would be to run our test suite.
Now, that’s definitely a way that we’re going to go even is not quite a perfect solution.
docker-compose up
All right, so again, this definitely works, but there is a little problem with this approach as well.
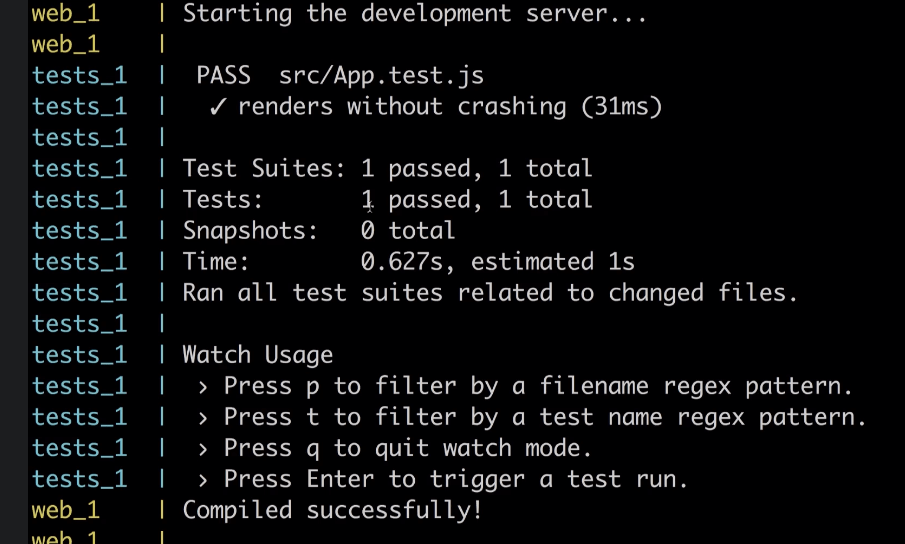
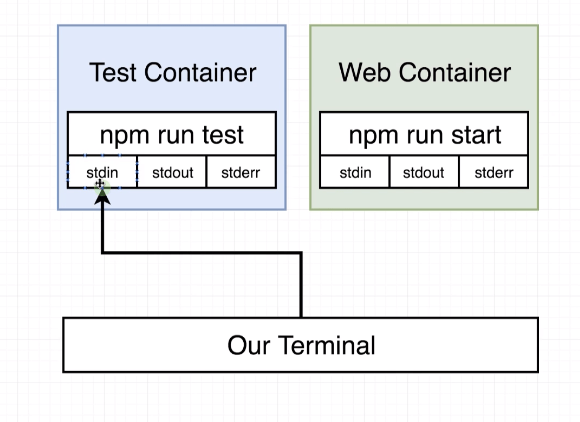
The downside to this approach is that we are getting all the output from our test suite inside of the kind of logging interface of Docker compose. And we don’t have the ability to enter any standard in output to that container. So I can’t hit enter to get the test suite to rerun. I can’t hit W to get any of the options inside the test suite to appear or anything like that.
We are going to open a second terminal window and we are going to get the ID of that running container with Docker.
docker ps
docker attach idTestContainer
We are attaching to the standard in, standard out and standard error of the primary process inside that container.
Unfortunately, this is as good as it gets with the Docker compose solution for running our tests.
When we use Docker compose, we’re not going to be able to be able to manipulate our test suite by entering p,q,t or Enter special commands.
But unfortunately with Docker attach, that is just not an option.
An alternative solution (without creating the service) but we believe that it is not the best would be the following. Open a second terminal:
docker ps

docker exec -it containerId npm run test
We get full interactivity here and tests’s changes are recognized.
So this is definitely a solution, but we don’t necessarily think it’s as good as it possibly could be.
It’s going to require you to start up Docker compose (creating test service is not necessary) , then get the idea that running container and run that Docker exec command, which is kind of hard to remember off the top of your head.
Then we have two solutions here. Neither of them are really 100% ideal, but at least you can pick one of the two that you like a little
In Development
We’re now going to start working on a second Docker file.
This second Docker file is going to make a second image that’s going to run our application specifically in production.
Dockerfile file
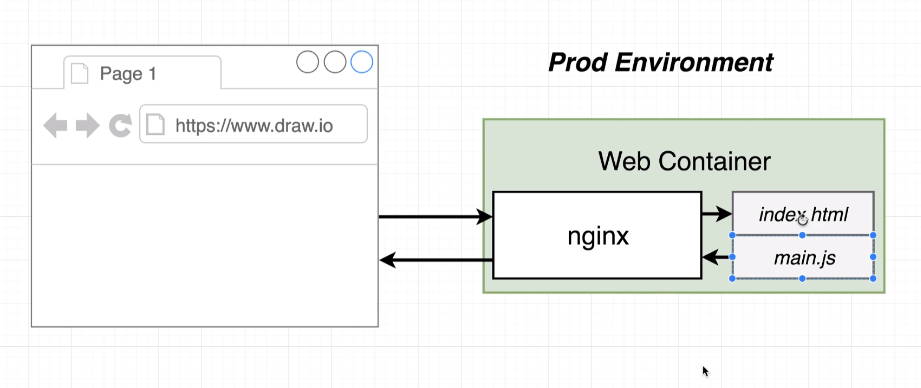
Inside this Docker file, we’re going to have two different locks of configuration. We’re going to have one block of configuration to implement something that we’re going to call the build phase and another block of configuration we’re going to call run phase.
npm run build process
docker build .
docker run -p 8080:80 containerId
We should be able to open up our browser, navigate to localhost:8080 and see the Welcome to React application up here on the screen.
Continous Integration and Deployment with AWS
We are going to use a couple of differents services: Github, Travis Cli and AWS.
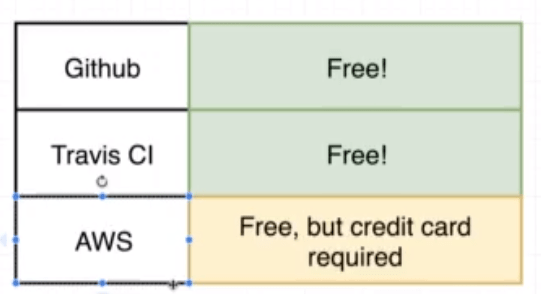
Now we’re going to see the config files to use these containers so we put together to really implement this flow that we spoke about earlier. We’re going to have a GitHub repo with some feature branch that you and I are going to develop on with a master branch that we’re going to deploy from and an integration with Travis CI and AWS as well.
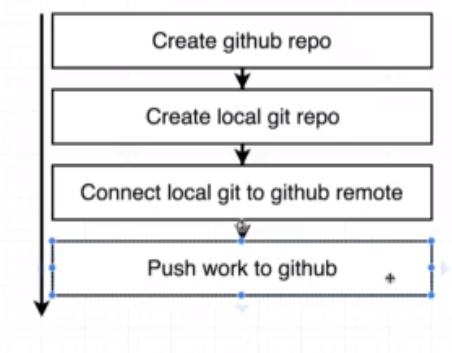
GitHub Setup
Travis CI Setup
Since travis-ci.org is no longer operational, you will be redirected to sign up at:
Along with this change, they have also updated their terms regarding free accounts and credits due to crypto mining abuse:
https://blog.travis-ci.com/2021-10-20-mining
Because of this, you will need to select a plan after registering.
Select Monthly Plans and then the free Trial Plan. This will give you 10,000 free credits to use within 30 days.
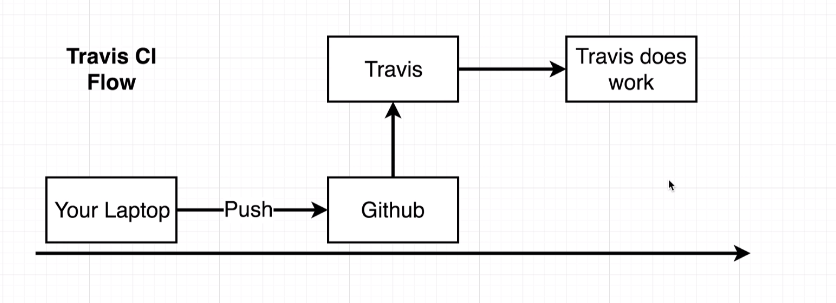
The entire idea of Travis CI is to watch for any time that you and I push some changes or some amount of code to the GitHub project that we just created. Any time that we push up some new code, GitHub is essentially going to tap on the shoulder of Travis and it’s going to say, Hey, this person just updated their GitHub repository. There’s some new code here or some new version of their application. Travis CI will then automatically pull down all of the code inside of our GitHub repository, and at that point, it essentially gives us the ability to do some work.
With Travis, we can do anything with your code that you can possibly imagine. We can test your code, we can deploy it.We could even delete the whole GitHub repository from Travis if for some crazy reason you wanted to. Traditionally, people use Travis for either testing their code base or for deployment, and for us, we’re going to use it for both.
We’re going to first use Travis to test our code, and then once our code comes up green or once the tests pass, successfully will automatically have Travis deploy our application over to AWS.
You can log in to Travis with your Github account and all you have to do is tell Travis which is your Github repository.
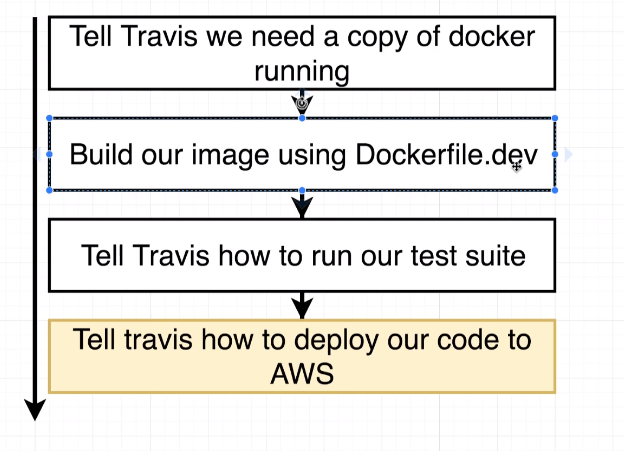
Then create this configuration file:
AWS Elastic Beanstalk
Now to deploy our project, we’re going to be making use of Elastic Beanstalk, which you can find by searching for elastic beanstalk.
This is a easiest way to get started with production Docker instances. Now to be clear, Elastic Beanstalk is most appropriate when you’re running exactly one container at a time. We can start up multiple copies of the same container, but at the end of the day, easiest way to run one single container. I will make another post on this blog where we will deploy a multi-container application, in this case we will use another platform, Google cloud, we will explain why at the time.
Now to deploy our project, we’re going to be making use of Elastic Beanstalk, which you can find by searching for elastic beanstalk in your AWS account. I’m going to click on this search result and then we get prompted with the EBS or the Elastic Beanstalk dashboard.
- Go to AWS Management Console
- Search for Elastic Beanstalk in «Find Services»
- Click the «Create New Application» button
- Enter «docker» for the Application Name
- Now we have to create something called an environment, click on «Create one now».
- Select «Web server environment»
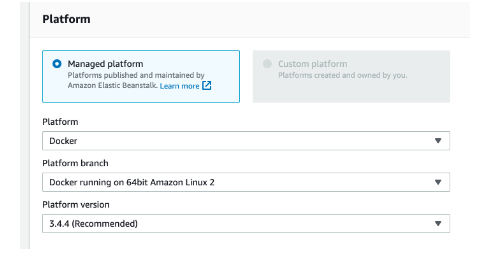
- Scroll down to «Platform» and select «Docker» from the dropdown list
- Change «Platform Branch» to Docker running on 64bit Amazon Linux 2
When creating our Elastic Beanstalk environment , we need to select Docker running on 64bit Amazon Linux 2 and make a few changes to our project:
This new AWS platform will conflict with the project we have built since it will look for a docker.compose.yml file to build from by default instead of a Dockerfile.
To resolve this, please do the following:
1. Rename the development Compose config file
Rename the docker-compose.yml file to docker-compose-dev.yml. Going forward you will need to pass a flag to specify which compose file you want to build and run from:
docker-compose -f docker-compose-dev.yml up
docker-compose -f docker-compose-dev.yml up --build
docker-compose -f docker-compose-dev.yml down
2. Create a production Compose config file
Create a docker-compose.yml file in the root of the project and paste the following:
| version: ‘3’ |
| services: |
| web: |
| build: |
| context: . |
| dockerfile: Dockerfile |
| ports: |
| – ’80:80′ |
AWS EBS will see a file named docker-compose.yml and use it to build the single container application.
- Select Sample application as a Aplication code.
- Click on «create environment»
- You should see a green checkmark after some time.
- Click the link above the checkmark for your application. This should open the application in your browser and display a Congratulations message.
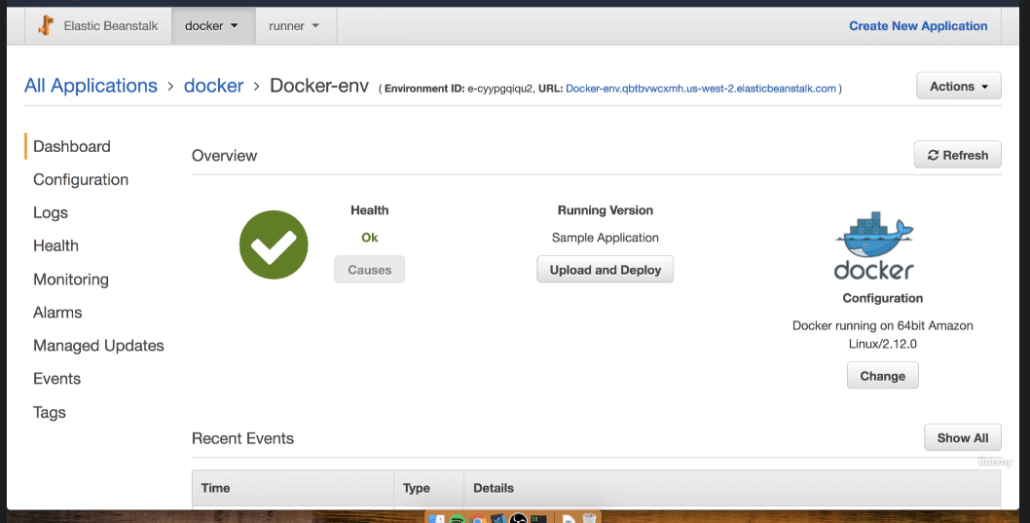
So as you can see on the very top line, we have a URL. This is the address of our application. As it stands right now, you can open up this link in a new tab and you’ll see a welcome message. So this is the default application that is launched any time that you make a new Elastic Beanstalk instance running Docker. So of course we’re going to eventually want to replace all this stuff with our application.
Change from Micro to Small instance type:
Note that a t2.small is outside of the free tier. t2 micro has been known to timeout and fail during the build process on the old platform. However, this may not be an issue on the new Docker running on 64bit Amazon Linux 2 platform. So, these steps may no longer be necessary.
1. In the left sidebar under Docker-env click «Configuration»
2. Find «Capacity» and click «Edit»
3. Scroll down to find the «Instance Type» and change from t2.micro to t2.small
4. Click «Apply»
5. The message might say «No Data» or «Severe» in Health Overview before changing to «Ok»
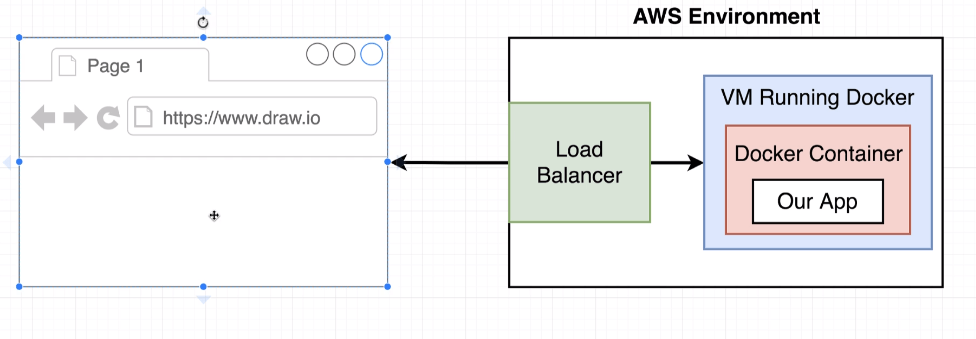
One of our users in reality, you and me, as we’re testing the application, is going to open up their web browser and attempt to navigate to our application running on AWS. When they attempt to navigate to our website, their request will be handled by a load balancer that has already been created as a part of the Elastic Beanstalk application. So this load balancer has already been created for us.
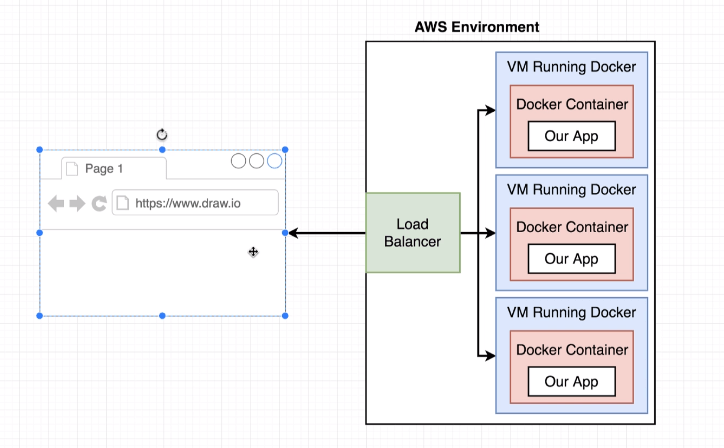
The benefit to Elastic Beanstalk is that it’s going to automatically scale everything up for us.
You must add delply section to .travis.yml .
Of course, You must adapt this configuration to the data of your application deployed in AWS.
| deploy: | |
| provider: elasticbeanstalk | |
| region: ‘us-east-1‘ | |
| app: ‘docker‘ | |
| env: ‘docker-env‘ | |
| bucket_name: ‘elasticbeanstalk-us-east-1-923445559289‘ | |
| bucket_path: ‘docker‘ | |
| on: | |
| branch: main | |
| access_key_id: $AWS_ACCESS_KEY | |
| secret_access_key: $AWS_SECRET_KEY |
Add AWS configuration details to .travis.yml file’s deploy script
1. Set the region. The region code can be found by clicking the region in the toolbar next to your username.
eg: ‘us-east-1’
2. app should be set to the Application Name (Step #4 in the Initial Setup above)
eg: ‘docker’
3. env should be set to the lower case of your Beanstalk Environment name.
eg: ‘docker-env’
4. Set the bucket_name. This can be found by searching for the S3 Storage service. Click the link for the elasticbeanstalk bucket that matches your region code and copy the name.
eg: ‘elasticbeanstalk-us-east-1-923445599289’
5. Set the bucket_path to ‘docker’
6. Set access_key_id to $AWS_ACCESS_KEY
7. Set secret_access_key to $AWS_SECRET_KEY
Create an IAM User
1. Search for the «IAM Security, Identity & Compliance Service»
2. Click «Create Individual IAM Users» and click «Manage Users»
3. Click «Add User»
4. Enter any name you’d like in the «User Name» field.
eg: docker-react-travis-ci
5. Tick the «Programmatic Access» checkbox
6. Click «Next:Permissions»
7. Click «Attach Existing Policies Directly»
8. Search for «beanstalk»
9. Tick the box next to «AdministratorAccess-AWSElasticBeanstalk»
10. Click «Next:Tags»
11. Click «Next:Review»
12. Click «Create user»
13. Copy and / or download the Access Key ID and Secret Access Key to use in the Travis Variable Setup.
Travis Variable Setup
1. Go to your Travis Dashboard and find the project repository for the application we are working on.
2. On the repository page, click «More Options» and then «Settings»
3. Create an AWS_ACCESS_KEY variable and paste your IAM access key from step #13 above.
4. Create an AWS_SECRET_KEY variable and paste your IAM secret key from step #13 above.
Deploying App
1. Make a small change to your src/App.js file in the greeting text.
2. In the project root, in your terminal run:
- git add.
- git commit –m “testing deployment«
- git push origin main
3. Go to your Travis Dashboard and check the status of your build.
4. The status should eventually return with a green checkmark and show «build passing»
5. Go to your AWS Elasticbeanstalk application
6. It should say «Elastic Beanstalk is updating your environment»


Dejar un comentario
¿Quieres unirte a la conversación?Siéntete libre de contribuir!